The nuclear model simulator is a free interactive lab with one alpha particle, one nucleus and three ladders to drive them. Choose an energy, choose a target, choose how far off centre to aim, and the panel answers with how far the alpha was turned and how deep it got. On arrival it reads 97.36°, 53.04 fm, 0.00711° and 0.79.
The third of those is the one to look at first. It is what a ball of charge the size of a whole atom could have managed with the same alpha, and its own sub-line gives the most generous version of that figure: the most a sphere of charge can ever give is 0.0181°. Press the first preset and the first card goes to 180.00° while that one does not move at all.
Nuclear Model Simulator
One alpha particle, one nucleus. Set the energy, pick the target, choose how far off centre you aim, then read off how far in it got. Aim dead centre and the alpha comes straight back out at 180°. Why that matters is the third readout: a ball of charge the size of a whole atom could never manage a hundredth of a degree.
Load a Real Scattering Event
Each button writes the three ladders and the flight slider and nothing else; the simulation does every calculation itself, exactly as it would if you had dragged them. All five put the flight slider back to 0.000 of the flight, so every comparison below starts from the same instant.
Press the first and then the third if you only press two. Both sit on the same gold nucleus at the same 5.0 MeV, and the only thing that changed between them is where the alpha was aimed.
Pick one of the five events above, or drag the four sliders yourself.
What Is the Nuclear Model Simulator?
The nuclear model simulator is a free interactive physics lab that runs in your browser, with nothing to install and no sign-up. One alpha particle is fired past one nucleus under electrostatic repulsion alone, and the panel answers two questions about it: how far it was turned, and how close it got.
Three ladders drive it. Alpha energy E steps through 12 fixed values from 1.0 MeV to 20.0 MeV, Target nucleus through six elements from aluminium (Z = 13) to uranium (Z = 92), and Aim off centre b through 14 fixed distances from 0.00 fm out to 1.00e+4 fm. Every state the lab can reach is one of those 1008 combinations, which is why any reading on this page can be arrived at exactly rather than approached.
Four cards carry the answer. Scattering angle prints how far the alpha was deflected, Closest approach prints how deep it got, A plum-pudding atom manages prints what a sphere of charge spread over a whole atom would have managed instead, and Count rate vs 90° prints how common a deflection of that size is. On arrival they read 97.36°, 53.04 fm, 0.00711° and 0.79.
The lab opens on a 5.0 MeV alpha aimed 20.00 fm off centre at gold, and that opening state is chosen to be unremarkable. It is an ordinary near miss, neither the exact straight-back case nor a glancing one, and the sentence under the first card names the whole setting as aimed 20.00 fm off centre at gold, at 5.0 MeV so that nothing has to be inferred from the slider positions.
Dragging the aim slider to its left stop is the state worth loading first. At 0.00 fm the first card reads exactly 180.00° and the second reads 45.50 fm, the same string the grid row below prints for a head-on hit at this energy. All 72 dead-centre states on the grid behave that way, at every energy and on every target.
That second card is the single most misread figure in this subject, and the panel is blunt about it. At dead centre its sentence changes to the gold nucleus is smaller than this, because the distance is an upper bound on the nuclear radius and only for the energy that produced it. It is not a radius, not a diameter and not a measurement of any nucleus.
Raising the energy tightens that bound in exact proportion. Walk the energy ladder with the aim at zero and the second card reads 227.51 fm, 45.50 fm, 22.75 fm and 11.38 fm at 1.0, 5.0, 10.0 and 20.0 MeV. The ladder stops at the top rung deliberately, well below the energy at which pure repulsion would stop being an honest description of what is happening.
The third card is the comparison the lab exists to make, and it carries no branch at all. It asks what a single sphere of charge the size of a whole atom could do to the same alpha, and its own sentence gives the most generous version of that: the most a sphere of charge can ever give is 0.0181° at 5.0 MeV on gold, against a point nucleus's 180.00°.
It does not move when the aim does, which is the point of putting it on the panel. Run the aim ladder end to end at 5.0 MeV on gold and the third card reads 0.00711° on all fourteen rungs while the first card walks from 180.00° down to 0.26°. Only the energy and the target slider move it.
The fourth card is why counting these events is hard. On that same aim ladder it runs from 0.25 at the straight-back end to 9.33e+9 at the shallowest rung, so almost everything a beam does is a slight deflection and the interesting events sit underneath by ten orders of magnitude. It depends on the angle alone: over the whole grid there are 505 angle-and-rate pairs across 505 distinct angles.
A compact grid under the cards gives four more readings: head-on, this energy would reach, a pudding's absolute maximum, orbit eccentricity and alpha speed. At the opening state they read 45.50 fm, 0.0181°, 1.3314 and 5.18% of c.
The eccentricity row is the shape of the path rather than a size. It is exactly 1.0000 on every dead-centre state, where the path has folded flat and come straight back; it is 1.0923 for an aim of 10.00 fm on gold at 5.0 MeV and 87.9122 for an aim of 2000.00 fm, where the path is nearly a straight line with a kink in it.
Five preset buttons on this landing page write the three ladders and recompute nothing. They load a dead-centre hit on gold, a near miss that turns right around, the glancing hit that is almost all of them, the same near miss on a light nucleus, and a dead-centre hit at four times the energy. Every one of them puts the flight slider back to 0.000 of the flight.
The pair worth pressing in order is the first and then the third. Both sit on the same gold nucleus at 5.0 MeV, and only the aim changes: 0.00 fm gives 180.00° with a rate of 0.25, while 2000.00 fm gives 1.30° with a rate of 1.49e+7. The third card prints 0.00711° for both.
The Along the flight slider runs from 0.000 of the flight to 1.000 of the flight in two hundred steps and moves the marker on the drawn path and nothing else. Run animates it to the far end, flips its own label to Pause and stops there by itself; pressed again from the far end it rewinds to zero and replays. Reset restores 5.0 MeV, gold (Z = 79), 20.00 fm and 0.000 of the flight.
The marker is stepped in equal slices of time rather than in equal slices of the curve, which is why it bunches near the turning point. At 0.500 of the flight it sits exactly on the turn, at the distance the second card is printing. On a dead-centre hit the alpha is brought to a complete stop there before it comes back out.
The drawing beside the panel is three labelled bands. The top band draws the path with both of its straight-line asymptotes dashed, the turn marked and a labelled scale bar in femtometres; the middle band plots the count-rate law against the angle on a logarithmic axis of nine decades; and the bottom band is one shared logarithmic distance axis with a tick at every decade and three markers on it.
The nucleus dot in the top band is drawn far larger than scale and its caption says so at every width. The scale bar rescales by four orders of magnitude across the aim ladder, so the dot marks where the nucleus is and never how big it is. The middle band measures a rate and the bottom band measures a distance, so no length in one means anything in the other.
The middle band also admits when it has run out of room. Its axis covers nine decades and 202 of the 1008 reachable states have a rate above the top one; on those the marker clamps to the top edge and is drawn as a hollow triangle rather than a disc, while the fourth card goes on printing the true figure, up to 3.26e+15 at the shallowest corner of the grid.
Nothing here is measured. The lab is told the energy, the target and the aim and works the rest out, so the marker tracing the path is the computed trajectory being drawn rather than evidence for it. What the three ladders are for is the comparison: hold two still, move the third, and watch which readings follow it and which do not.
The assumptions are the lab's own and are printed in a fixed line under the drawing: a point nucleus, a fixed target that does not recoil, pure unscreened repulsion with no electrons, one scattering event, no nuclear force, and a non-relativistic alpha. The plum-pudding comparison additionally holds the sphere radius at the gold atomic radius for all six targets. They are stated assumptions and not measurements of any atom.
| Control | Range | Step, default and what it moves |
|---|---|---|
| Alpha energy E | 1 to 20 MeV | a ladder of 12 fixed rungs - 1, 2, 3, 4, 5, 5.5, 6, 7, 8, 10, 15 and 20 MeV - so the slider itself steps 1 index at a time and opens on rung 4, where the label reads "5.0 MeV". It is the only control other than the target that moves the third card, because the aim does not appear in that comparison at all |
| Target nucleus | 6 elements | a ladder of six elements - aluminium, copper, silver, gold, lead and uranium - stepping 1 index at a time and opening on rung 3, where the label reads "gold (Z = 79)". Only the atomic number enters the arithmetic, because the charge is treated as sitting at one point, so nothing else about the element is used |
| Aim off centre b | 0 to 10000 fm | a ladder of 14 fixed rungs from 0 to 10000 fm, stepping 1 index at a time and opening on rung 5, where the label reads "20.00 fm". The lowest rung is dead centre and takes its own branch, returning exactly 180.00 degrees rather than dividing by zero; the highest prints in exponential form as "1.00e+4 fm" |
| Along the flight | 0 to 1 | step 0.005, opens at 0, and the label reads "0.000 of the flight". It moves the marker on the drawn path and not one physics reading on the panel. The marker steps in equal slices of time rather than of the curve, so it bunches near the turning point, and at 0.500 of the flight it sits exactly on the turn |
| Run and Pause | one button | one button that animates the flight slider to 1.000 of the flight, flips its own label to Pause while it runs and stops of its own accord at the far end. Pressed again from there it rewinds to zero and replays. Pressing Run while one pass is already in flight adds no second pass, and a run advances nothing but the flight slider |
| Reset | one button | restores the opening state - a 5.0 MeV alpha on gold aimed 20.00 fm off centre, at 0.000 of the flight - and replays the settle, so the scene is drawn in rather than cut to. That opening state reads 97.36 degrees and 53.04 fm, which is an ordinary near miss rather than either of the two exact cases |
How to Use the Simulator
- Read the four cards before you touch anything. They are already answering for a 5.0 MeV alpha aimed 20.00 fm off centre at gold: Scattering angle
97.36°, Closest approach53.04 fm, A plum-pudding atom manages0.00711°and Count rate vs 90°0.79. - Read the sentence under each card, because that is where the panel shows its hand. They read
aimed 20.00 fm off centre at gold, at 5.0 MeV,it never gets closer than this,the most a sphere of charge can ever give is 0.0181°andhow often this angle happens, against 90°. - Drag Aim off centre b all the way left. At
0.00 fmthe angle becomes180.00°, the closest approach falls to45.50 fm, and its sentence changes tothe gold nucleus is smaller than this, which is a bound stated as a bound. - Now drag it all the way right. At
1.00e+4 fmthe angle is down to0.26°, the closest approach has become the aim itself at1.00e+4 fm, and the rate card has climbed to9.33e+9. That one slider spans ten orders of magnitude of rate. - Put the aim back on
20.00 fmand move Alpha energy E instead. At the bottom rung,1.0 MeV, the angle is160.06°and the head-on row reads227.51 fm; at the top rung,20.0 MeV, they are31.75°and11.38 fm. Energy buys depth and costs deflection. - Move Target nucleus with the other two held still. At the same 5.0 MeV and 20.00 fm, aluminium gives
21.21°and uranium gives105.91°. The ladder has six elements on it and nothing between them. - Watch the third card through all of that. It moves when the energy or the target moves and at no other time, because the aim is not in it. That is the whole point of putting it on the panel at all.
- Press Run. It flips its own label to Pause, animates Along the flight to
1.000 of the flightand stops there by itself, flipping back to Run. Press it again from the far end and it rewinds to zero and replays. No other reading on the panel is touched by any of that. - Drag Along the flight by hand to
0.500 of the flight. The marker lands exactly on the turning point, and the distance it sits at there is the closest-approach card to the last bit rather than merely close to it. - Press Reset when you have finished. It puts the four sliders back to
5.0 MeV,gold (Z = 79),20.00 fmand0.000 of the flight, and replays the opening settle so the scene is drawn in rather than cut to.
Dragging is the right way to find out which readings move together and a poor way to land on a particular state, because all three ladders step by whole rungs rather than by their units. The five preset buttons above exist for that reason, and the written guide to the nuclear model is where the argument is made from scratch and the problems are worked with every step shown.
One thing this panel cannot do is take an energy, a target or an aim that is not on a rung, and the two inverse questions are beyond it altogether. The Rutherford scattering calculator takes typed figures, and it will also run the relation backwards: the aim behind a measured angle, or the energy behind an angle and an aim.
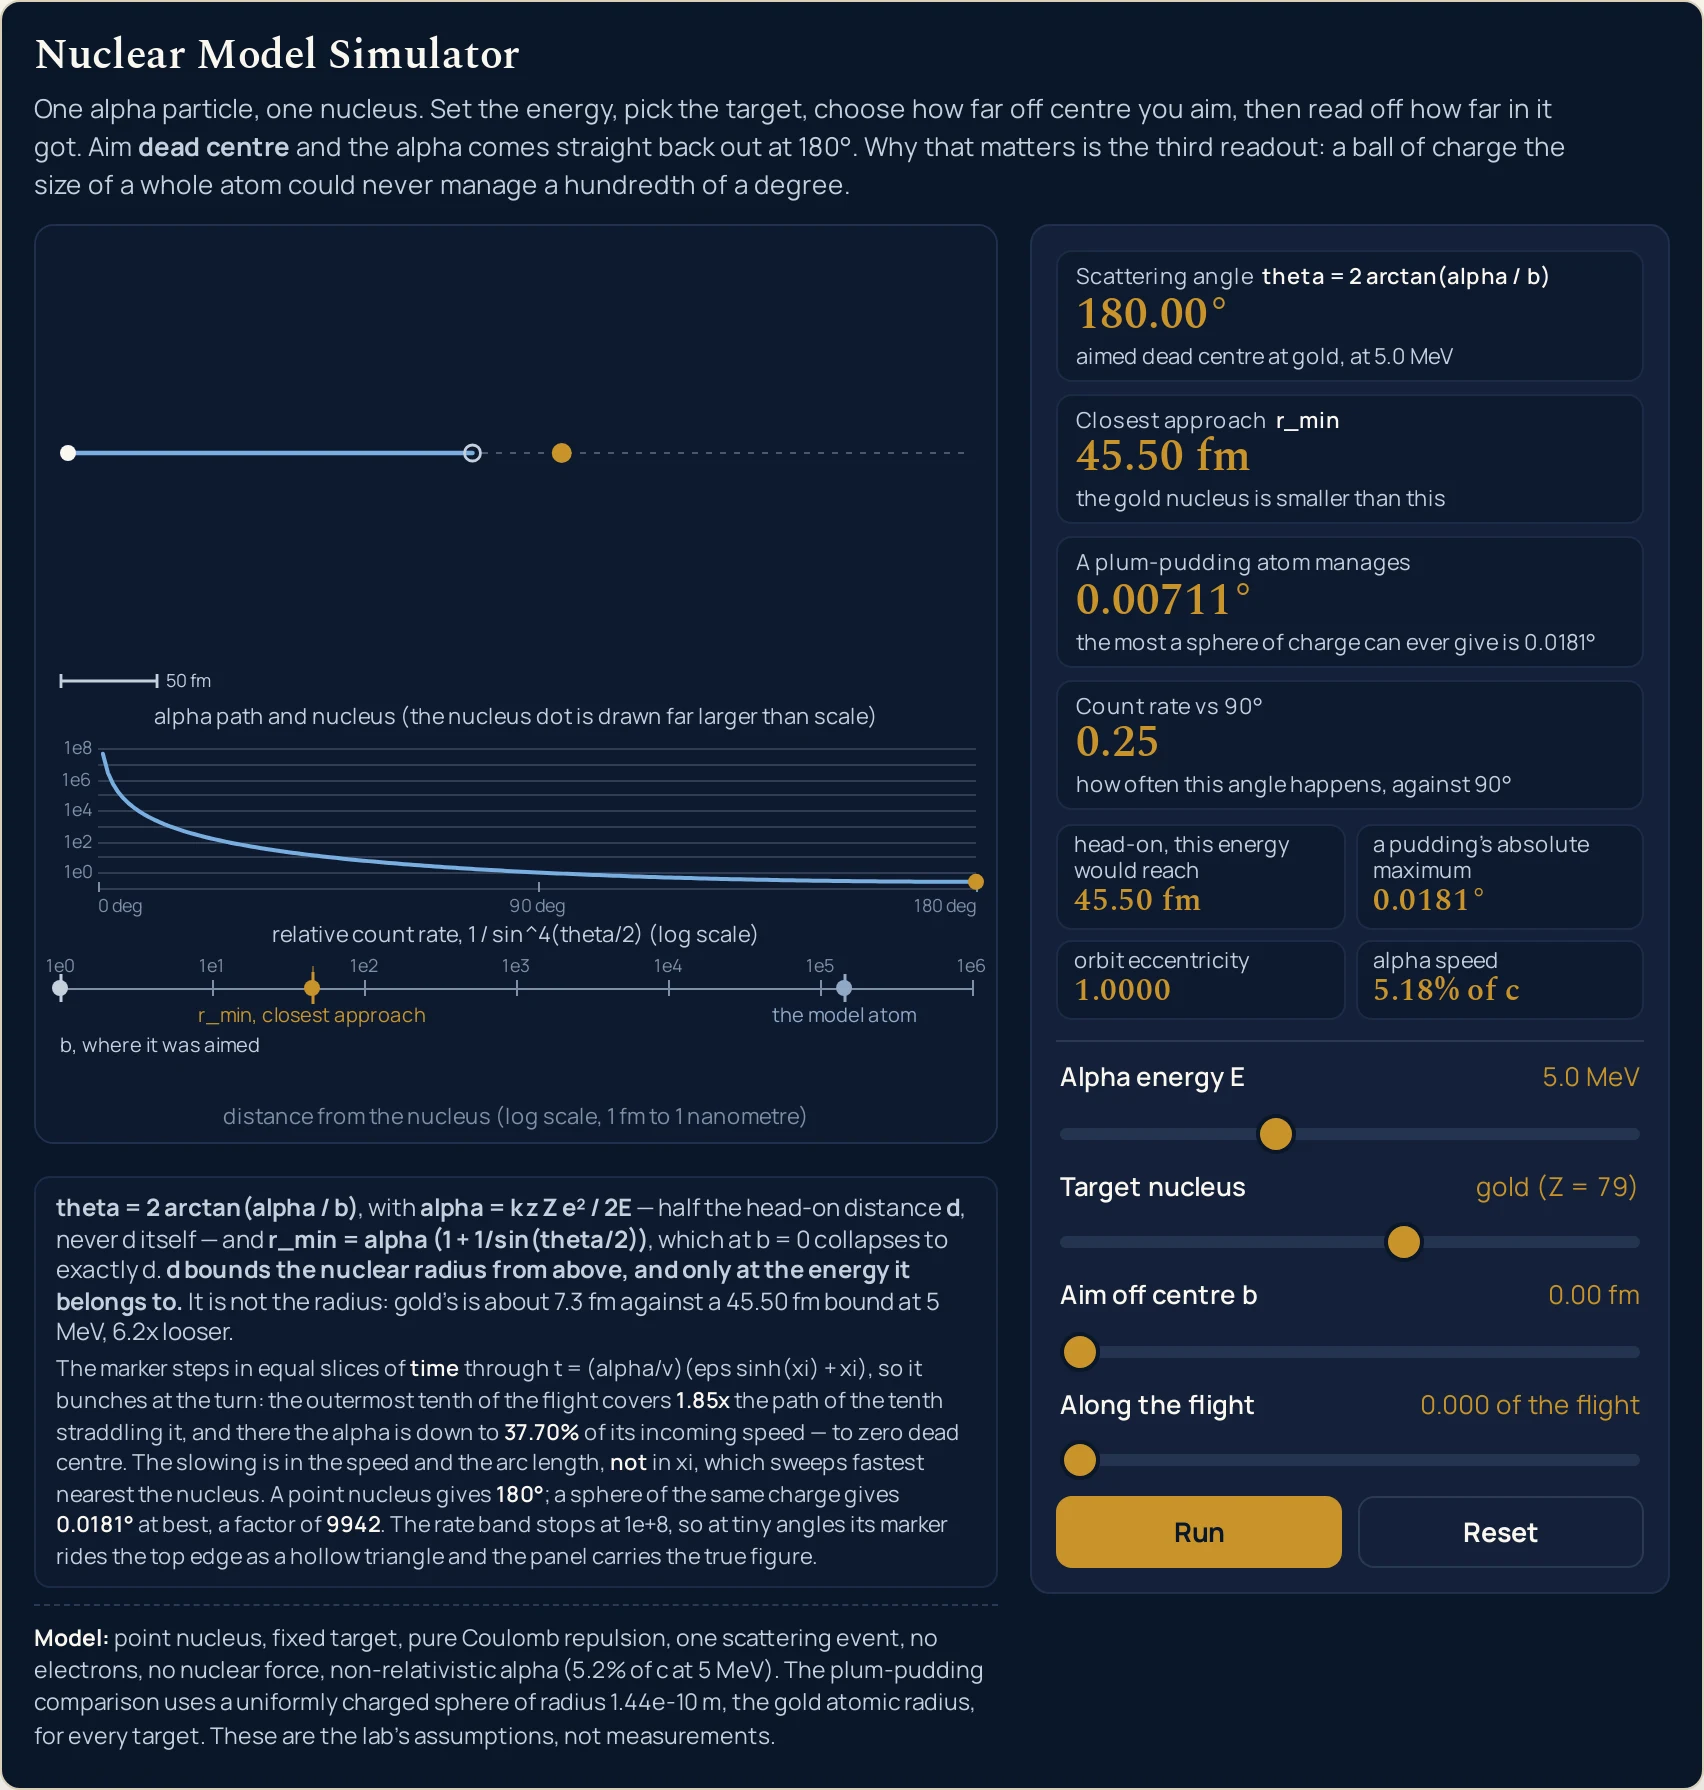
0.00 fm the first card is exactly 180.00° and both distances read 45.50 fm — a bound on the gold nucleus at 5.0 MeV and at no other energy. The band text is what the drawing paints at this page’s own width; it shortens on a narrow column, band by band.Worked Example: The Same Gold Nucleus, 180.00° and 1.30°
Nothing in the tables below was worked out here. Each column is a setting the lab was put into through its own sliders and then read back from, cell by cell, so every string in them is the panel’s own. The first table is the pair the whole lab was built around.
One: one nucleus, one energy, two aims, and two answers that are nothing alike
Press Aim dead centre at gold and then The glancing hit that is almost all of them. Only the aim ladder moves between them, so the first two rows and the head-on row are the same string twice. This table is transposed, because the comparison worth making runs down a column.
| Panel reading | Aim dead centre at gold | The glancing hit that is almost all of them |
|---|---|---|
| Alpha energy E | 5.0 MeV | 5.0 MeV |
| Target nucleus | gold (Z = 79) | gold (Z = 79) |
Aim off centre b |
0.00 fm | 2000.00 fm |
| Scattering angle | 180.00° | 1.30° |
| the aim that produced it | aimed dead centre at gold, at 5.0 MeV | aimed 2000.00 fm off centre at gold, at 5.0 MeV |
Closest approach r_min |
45.50 fm | 2022.88 fm |
| what that distance is | the gold nucleus is smaller than this | it never gets closer than this |
| A plum-pudding atom manages | 0.00711° | 0.00711° |
| a pudding’s absolute maximum | 0.0181° | 0.0181° |
| Count rate vs 90° | 0.25 | 1.49e+7 |
| head-on, this energy would reach | 45.50 fm | 45.50 fm |
| orbit eccentricity | 1.0000 | 87.9122 |
| alpha speed | 5.18% of c | 5.18% of c |
Read the head-on row first and then stop. It prints 45.50 fm in both columns, because it is worked from the energy and the target alone and neither of those moved. The aim is the only thing separating these two settings, and it has taken the first card from 180.00° to 1.30°.
The fourth card is the size of the consequence. The straight-back hit reads 0.25 and the glancing one reads 1.49e+7. Those two deflections happen at wildly different rates in the same beam on the same foil, and that single pair of strings is why a glancing hit is what almost every alpha does.
The third card is the one that did not move, and that is the result. It reads 0.00711° in both columns, and its sub-line offers the most generous version of the same comparison at 0.0181°. The spread-out atom is being given its best case and is still nowhere near the first column.
Two: the five events, and what each one is for
These are the buttons above with the readings they produce at 0.000 of the flight. Read the last two columns across: the pudding column barely moves while the rate column swings by eight orders of magnitude.
| Preset | Alpha energy | Target nucleus | Aim off centre | Scattering angle | Closest approach | A pudding manages | Count rate |
|---|---|---|---|---|---|---|---|
| Aim dead centre at gold | 5.0 MeV | gold (Z = 79) | 0.00 fm | 180.00° | 45.50 fm | 0.00711° | 0.25 |
| A near miss that turns right around | 5.0 MeV | gold (Z = 79) | 10.00 fm | 132.55° | 47.60 fm | 0.00711° | 0.36 |
| The glancing hit that is almost all of them | 5.0 MeV | gold (Z = 79) | 2000.00 fm | 1.30° | 2022.88 fm | 0.00711° | 1.49e+7 |
| A light nucleus barely deflects it | 5.0 MeV | aluminium (Z = 13) | 10.00 fm | 41.05° | 14.42 fm | 0.00117° | 16.54 |
| Raise the energy, shrink the approach | 20.0 MeV | gold (Z = 79) | 0.00 fm | 180.00° | 11.38 fm | 0.00178° | 0.25 |
Rows two and four are the cleanest pair in the table. Same energy, same aim of 10.00 fm, and only the target changed: gold gives 132.55° and aluminium gives 41.05°, while the head-on bound behind them falls from 45.50 fm to 7.49 fm. A light nucleus is a poor backscatterer, and this is the arithmetic of it.
Rows one and five are the other exact pair. Both are dead centre on gold, and four times the energy has tightened the closest approach from 45.50 fm to 11.38 fm — a factor of exactly four. Row five is also the only one where the speed row leaves 5.18% of c, reading 10.36% of c instead.
Reading the Diagram: Three Bands and One Honest Scale
The drawing is laid out as three bands and each band’s caption strip is reserved before anything is placed in it, so no part of the picture is ever painted across another. The top band carries the path, the middle band carries the rate law, and the bottom band carries the one axis that is a length.
| Part of the drawing | What it paints | What it does not claim |
|---|---|---|
| the path band | The top band. One alpha's curved path past one nucleus, with both of its straight-line asymptotes dashed, the turning point marked, the flight marker on the path, and a labelled scale bar in femtometres that rescales with the aim | the nucleus dot is a position and never a size, and the caption says so at every width. The scale bar runs through four orders of magnitude across the aim ladder, so no two settings may be compared by eye |
| the rate band | The middle band. The count-rate law against the scattering angle on a logarithmic vertical axis of nine decades, with a marker at the angle the first card is printing | it is a ratio and not a count of anything. On 202 of the 1008 states the true rate is above the top decade, and there the marker clamps to the top edge and becomes a hollow triangle rather than a disc |
| the distance band | The bottom band. One shared logarithmic distance axis anchored on the decades from one femtometre to a million, with a tick at every decade and three labelled markers: the closest approach, the aim, and the model atom | it is the only band in the drawing whose axis is a length, so nothing in the two bands above may be measured against it. The three markers never cross: the closest approach is outside the aim on all 1008 states |
| what the picture is for | Seeing the gap. The closest-approach marker sits in the tens of femtometres on most settings while the model atom sits four clear decades further out, and the empty space between them is the whole claim | it is not evidence. The axis is drawn from the numbers you set, so it shows you the scale of the result rather than discovering it |
The nucleus dot is drawn far larger than scale, and the reason is arithmetic rather than laziness. The path band carries a labelled scale bar, and on the opening state that bar stands for 200 fm across a few dozen pixels. A nucleus a handful of femtometres across would be a fraction of one pixel at that scale, so the dot marks a position and the caption keeps saying it is not a size.
The middle band tells you when it has run out of room. Its axis covers nine decades, and 202 of the 1008 reachable states have a rate above the top one. On those the marker clamps to the top edge and is drawn as a hollow triangle instead of a disc, while the fourth card goes on printing the real figure — up to 3.26e+15 at the shallowest corner of the grid.
The bottom band is the nuclear model in one picture, and it is the only band whose axis is a length. Six decades are anchored on their own ticks from one femtometre to a million, the closest approach and the aim sit where the panel says they do, and the model atom sits far to the right of both. The closest approach is outside the aim on all 1008 states, so those two markers never cross.
A rate is not a distance and a distance is not a rate, so nothing in the middle band may be measured against anything in the bottom one. The repulsion that puts the markers where they are has a page of its own: the Coulomb’s law simulator is the same force with no trajectory attached to it.
Formula and Symbol Reference
The band at the head of this page carries the relation with the Rutherford length written out beside it, because the length is half the head-on distance and quoting the angle relation without it is how the factor of two goes missing. Every reading on the panel is that one relation read somewhere else, or a quantity derived from the state it describes.
The symbol column below uses the panel’s own names for its readings, spelled the way the lab’s own equation line spells them. Getting the head-on distance at all is an energy-conservation argument, which the conservation of energy guide sets out, and the repulsion doing the work is the Coulomb's law guide.
| Symbol or readout | Meaning | SI unit | In this lab |
|---|---|---|---|
| theta | The scattering angle: how far the alpha has been turned from the line it came in on, measured between its two straight-line asymptotes. It is the thing the lab measures and never the thing you set | degree (an SI-accepted unit) | the first card, to 2 d.p. Over the whole 1008-state grid it runs from 180.00° at every one of the 72 dead-centre states down to 0.01° at the corner where a 20.0 MeV alpha passes an aluminium nucleus 1.00e+4 fm out. Its sub-line names the aim and the energy that produced it, as aimed 20.00 fm off centre at gold, at 5.0 MeV. |
| b | The impact parameter: the perpendicular distance between the nucleus and the straight line the alpha would have followed if nothing had deflected it. This is the aim, and it is the quantity you control | metre (m), shown in femtometres | a ladder of 14 rungs, 0.00 fm to 1.00e+4 fm, opening on 20.00 fm. The slider steps one index at a time, so no intermediate aim exists. The lowest rung prints 0.00 fm and the sub-line calls it dead centre rather than quoting a distance of zero. |
| alpha | The Rutherford length, and the only length the geometry of the path depends on. It is HALF the head-on distance, and dropping that factor of two is the commonest error in this subject | metre (m) | not a card of its own: it is exactly half whatever the head-on, this energy would reach row prints. At 5.0 MeV on gold that row reads 45.50 fm, so the Rutherford length there is 22.75 fm — which is not a rung of the aim ladder, and the nearest one, 20.00 fm, reads 97.36° rather than ninety. |
| d | The head-on distance: how close a dead-centre alpha of this energy gets before it is turned round. It is an upper bound on the nuclear radius at that energy and it is never a nuclear size | metre (m) | the first grid row, and it depends on the energy and the target only — moving the aim never changes it. Down the energy ladder on gold it runs 227.51 fm, 45.50 fm, 22.75 fm, 11.38 fm at 1.0, 5.0, 10.0 and 20.0 MeV. |
| r_min | The closest approach for the aim you actually chose. It is the distance the drawing marks at the turning point, and it is larger than the head-on distance everywhere except dead centre | metre (m) | the second card. It is toFixed(2) below 1e4 fm and switches to an exponential form at or above it, which is why the top rung of the aim ladder prints 1.00e+4 fm. At dead centre it prints the same string as the grid row above. |
| E | The alpha particle's kinetic energy as it arrives, far from the nucleus. It enters through the Rutherford length and nowhere else, which is why it moves every distance on the panel and no rate | joule (J), shown in megaelectronvolts | a ladder of 12 rungs, 1.0 MeV to 20.0 MeV, opening on 5.0 MeV. The ladder stops at the top rung deliberately; the reason is set out under “Where It Breaks Down”. |
| Z | The target's atomic number, which is all the lab needs to know about it. The charge is treated as sitting at one point, so nothing else about the element enters the arithmetic | dimensionless count | a ladder of 6 elements, printed with the number beside the name: aluminium (Z = 13), copper, silver, gold (Z = 79), lead and uranium (Z = 92). It opens on gold. |
| rate | How often a deflection of this size happens, against a ninety-degree one. It is the reading that explains why the counting took years, and it depends on the angle and on absolutely nothing else | dimensionless ratio | the fourth card. It is toFixed(2) between 1e-2 and 1e4 and exponential outside that, so the grid spans 0.25 to 3.26e+15. Across all 1008 states there are 505 distinct angle-and-rate pairs over 505 distinct angles, so no two different angles ever share a rate. |
| pudding average | What a single sphere of charge spread over a whole atom would deflect this alpha by on average, worked for the same energy and the same target charge. It is the comparison the lab exists to make | degree | the third card, to three significant figures. It is 0.00711° at 5.0 MeV on gold and 0.00117° on aluminium, and it does not move when the aim does. Its smallest value anywhere on the grid is 0.000292°. |
| pudding maximum | The very biggest deflection that same sphere of charge could ever produce, for an alpha grazing its surface. It is the generous end of the comparison and the honest one to quote | degree | the second grid row, and the figure the third card's own sub-line carries, as the most a sphere of charge can ever give is 0.0181°. It is 0.00298° on aluminium at the same energy, and its largest value anywhere on the grid is 0.105°. |
| eps | The eccentricity of the alpha's orbit. One means the path has folded flat and come straight back; a large value means it is nearly a straight line with a kink in it | dimensionless | the third grid row, to 4 d.p. It is exactly 1.0000 on every dead-centre state, 1.0923 at 10.00 fm and 87.9122 at 2000.00 fm on gold at 5.0 MeV, and it reaches 1.07e+4 at the grid's shallowest corner. |
| beta | The alpha's incoming speed as a percentage of the speed of light. It is worked out without relativity, which is a stated assumption of this lab rather than an oversight | dimensionless fraction | the fourth grid row. It depends on the energy alone, so it takes twelve values over the whole grid, from 2.32% of c at the bottom rung to 10.36% of c at the top. |
| along the flight | Where the marker sits on the drawn path, as a fraction of the flight. It changes the picture and nothing else: not one physics reading on the panel depends on it | fraction (not an SI quantity) | 0 to 1 in 200 steps, opening at 0.000 of the flight. At 0.500 of the flight the marker sits exactly on the turning point, and the lab's own harvest records its distance there as bit-for-bit equal to the closest-approach card. |
If you read one row twice, make it the third. The aim that gives exactly ninety degrees is the Rutherford length itself, at every energy and on every target — and it is not a rung of this lab’s aim ladder, which is why the nearest reachable setting reads 97.36° and not 90.00°.
The Physics: What a Plum Pudding Could Never Do
The third card is a comparison and not a measurement, and it is the only reading on the panel that is about a different atom entirely. It asks what a single sphere of charge spread over a whole atom would do to the same alpha, using the same target charge and the same energy, so the two sides of the comparison are built from the same length and the comparison is fair.
At 5.0 MeV on gold the panel gives three numbers that settle the matter. The spread-out atom manages 0.00711° on average and 0.0181° at the very most; a point nucleus at the same energy gives 180.00°, and the lab’s own text line under the drawing puts that last ratio at 9942. The generous end of one model is nowhere near the ordinary end of the other.
That conclusion survives every rung of every ladder, which is worth checking rather than assuming. Across all 1008 reachable states the largest absolute maximum a sphere of charge ever reaches is 0.105°, so the smallest point-to-pudding ratio anywhere on the grid is still 1707 to one. The sphere radius is held at the gold atomic radius for all six targets, which the panel states outright as an assumption.
The second thing the panel settles is why the hard deflections were so hard to find. The table below is the aim ladder at 5.0 MeV on gold with nothing else moved: fourteen rungs, read straight off the panel.
| Aim off centre | Scattering angle | Closest approach | Count rate vs 90 deg |
|---|---|---|---|
| 0.00 fm | 180.00° | 45.50 fm | 0.25 |
| 1.00 fm | 174.97° | 45.52 fm | 0.25 |
| 2.00 fm | 169.95° | 45.59 fm | 0.25 |
| 5.00 fm | 155.21° | 46.05 fm | 0.27 |
| 10.00 fm | 132.55° | 47.60 fm | 0.36 |
| 20.00 fm | 97.36° | 53.04 fm | 0.79 |
| 50.00 fm | 48.93° | 77.68 fm | 8.50 |
| 100.00 fm | 25.63° | 125.31 fm | 103.21 |
| 200.00 fm | 12.98° | 224.04 fm | 1531.77 |
| 500.00 fm | 5.21° | 523.27 fm | 5.86e+4 |
| 1000.00 fm | 2.61° | 1023.01 fm | 9.34e+5 |
| 2000.00 fm | 1.30° | 2022.88 fm | 1.49e+7 |
| 5000.00 fm | 0.52° | 5022.80 fm | 5.83e+8 |
| 1.00e+4 fm | 0.26° | 1.00e+4 fm | 9.33e+9 |
The angle column walks and the rate column runs. From the top of the table to the bottom the angle goes from 180.00° to 0.26° while the rate climbs from 0.25 to 9.33e+9. Nothing about the aim is extreme at either end; the collapse is entirely in how the rate law treats small angles.
The rate depends on the angle and on nothing else, and the grid proves it rather than asserting it. A 5.0 MeV alpha aimed 2000.00 fm off centre at gold reads 1.30° and 1.49e+7; a 20.0 MeV alpha aimed 500.00 fm off centre at the same gold reads the identical pair, with a quite different closest approach. Over the whole grid there are 505 angle-and-rate pairs across 505 distinct angles.
The marker on the path is stepped in time, not in the shape of the curve, and the distinction is real. The lab’s own line under the drawing records that the outermost tenth of the flight covers 1.85 times the path of the tenth straddling the turn, and that the alpha is down to 37.70 per cent of its incoming speed there. On a dead-centre hit it is brought to a complete stop before it comes back.
None of this is new physics and the lab does not pretend otherwise; what is new here is that it is driven and read rather than described. Where the alpha itself comes from, and what energy it arrives with, is the alpha decay guide — this lab takes that energy as given and does nothing else with it.
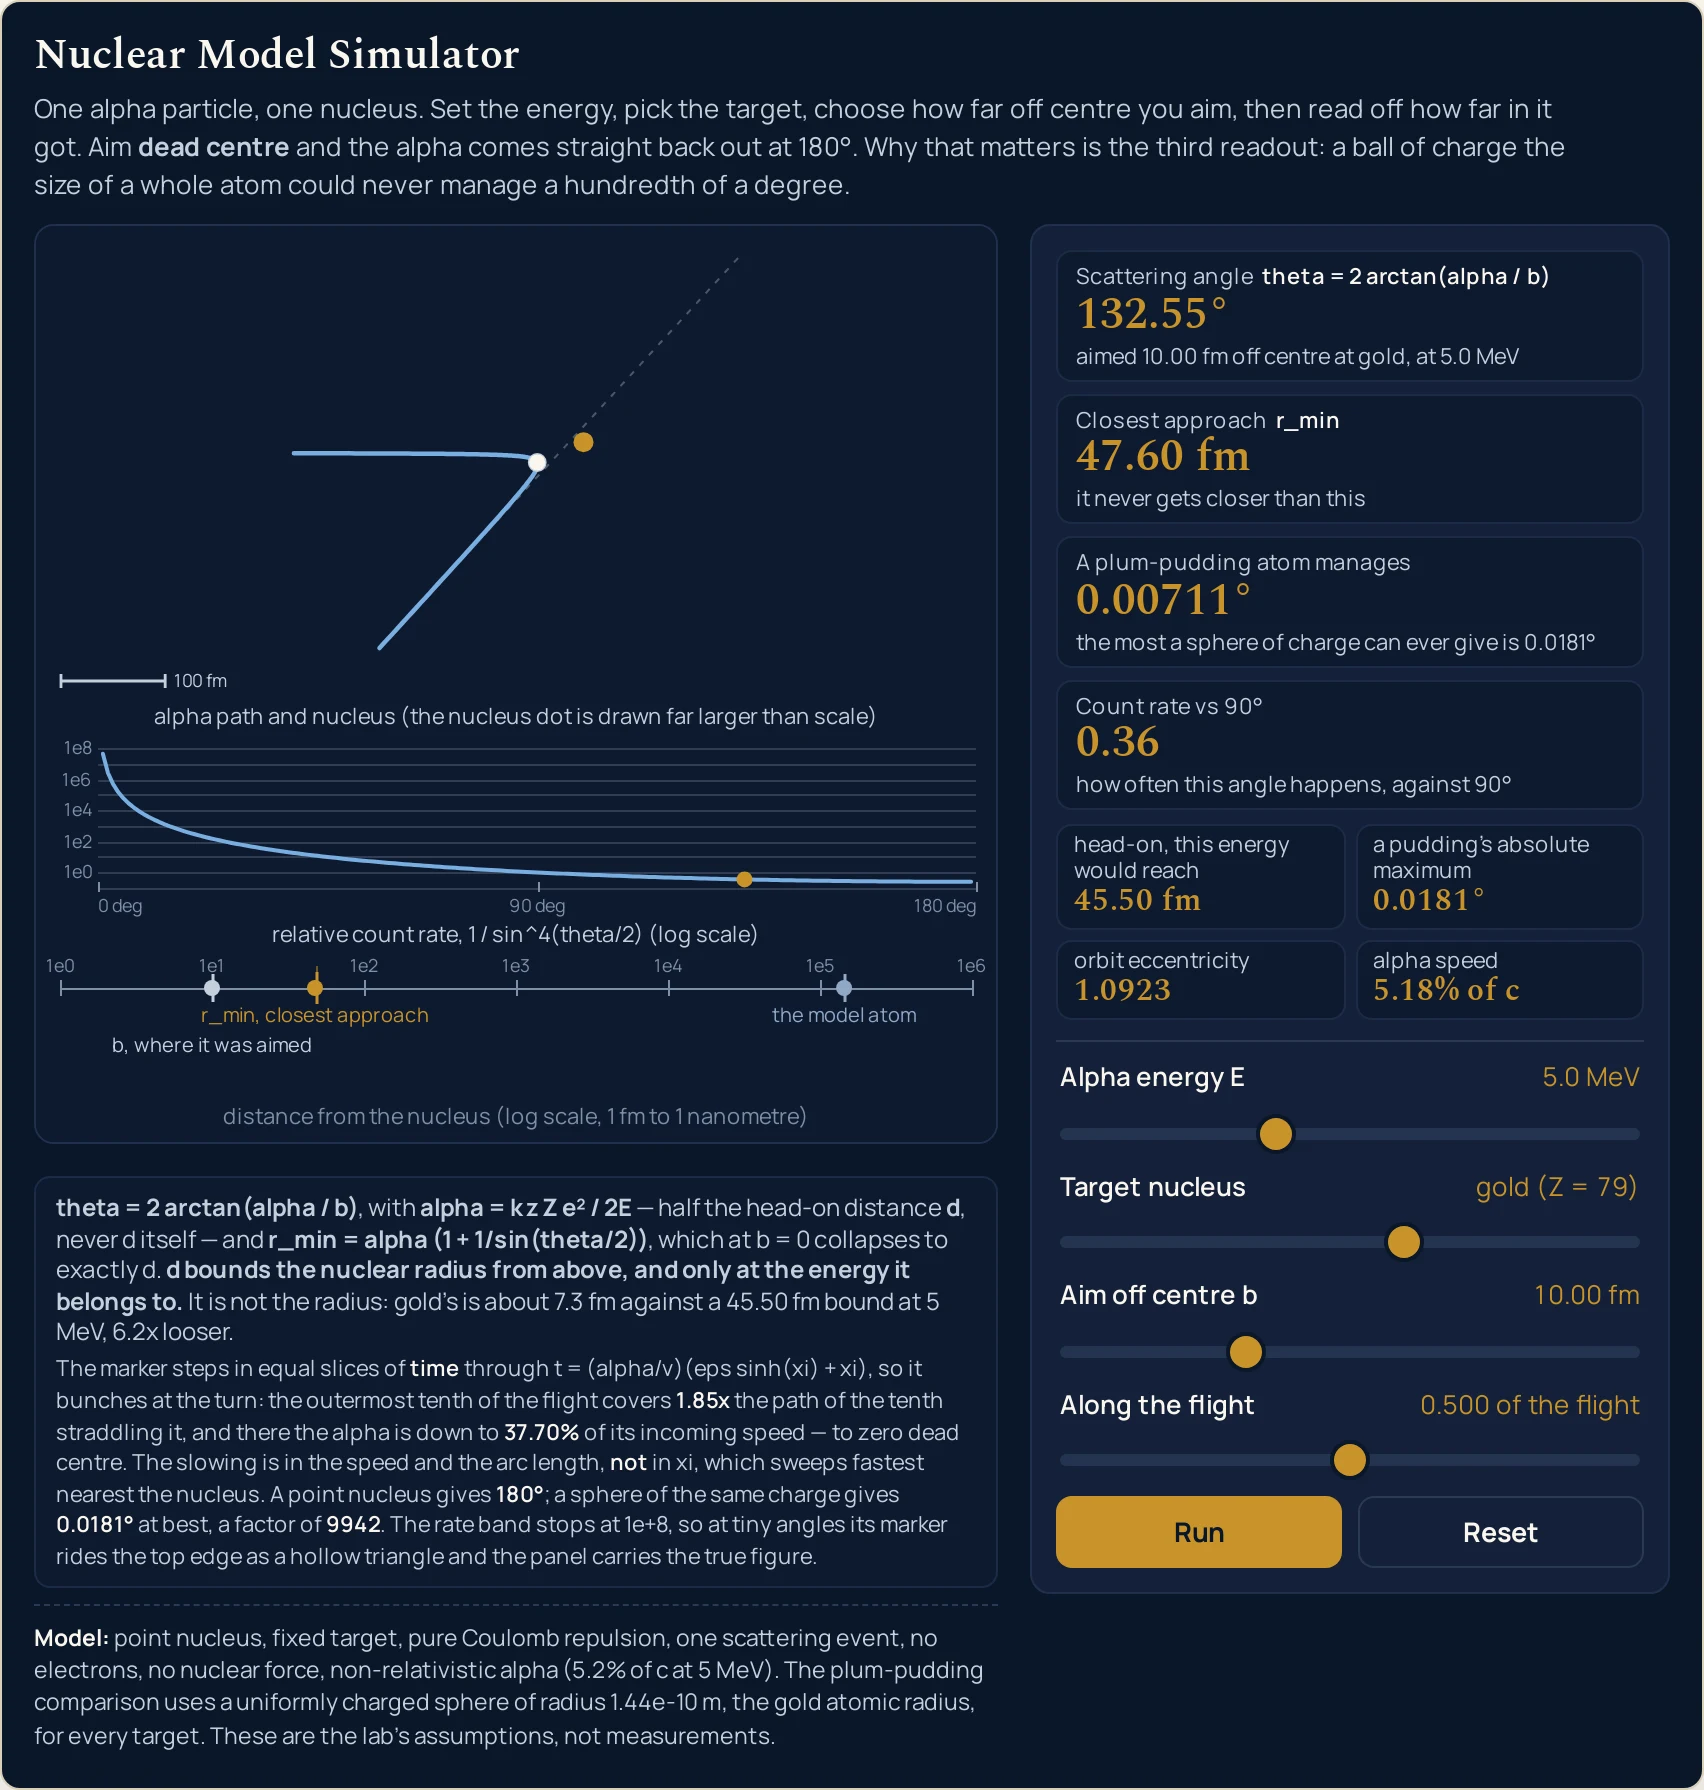
0.500 of the flight, which is where the marker lands exactly on the turn. The panel still reads 132.55° and 47.60 fm: moving the flight slider changes the picture and not one figure. The distance the marker sits at here is the second card to the last bit rather than merely close to it.Where It Breaks Down
Every state the three ladders can reach is answered, and the arithmetic is not where this lab can let you down. What it cannot do is model a real atom, and what it chooses not to do is treat its own idealisations as facts. Ten limits sit under every reading on this page, and the first is the one a reader is most likely to get wrong.
- The closest approach is an upper bound on the nuclear radius, it belongs to one energy, and it is not the radius
- This is the biggest one and the lab prints its own warning about it under the drawing. At
5.0 MeVon gold a dead-centre hit reaches45.50 fm, and that establishes only that all of the positive charge is somewhere inside that distance; the real gold nuclear radius is about 7.3 fm, so the bound is 6.2 times looser than the thing it bounds. Raising the energy tightens it —11.38 fmat20.0 MeV— but by the cluster’s reference computation that is still about 1.6 times looser, and quoting any of these without its energy beside it says nothing at all. - The energy ladder stops at the top rung on purpose
- The empirical relation that gives a nuclear radius from a mass number — a constant of 1.2 fm times the cube root of it — puts gold at about 6.98 fm, and the cluster’s reference computation finds the head-on distance reaching that radius at about 32.58 MeV. Past that point “pure repulsion, no nuclear force” is simply a false description, so the ladder stops comfortably below it rather than answering in a region where the physics is the wrong physics. Both of those figures are off-panel and should be verified before use.
- The nucleus is a point, and that is the assumption under test
- Every distance on the panel is computed as though all of the target’s positive charge sat at a single mathematical point. That is deliberate rather than careless: the whole argument is about how concentrated the charge is, and the point model is the thing being examined. The drawing is honest about the consequence by drawing the dot far larger than scale and saying so.
- There is no nuclear force in the relation at all
- Electrostatic repulsion is the only thing bending the path, from the first frame to the last. Once an alpha gets close enough to feel the strong interaction the deflections stop following this law entirely, and nothing on the panel would warn you — the readings would go on looking perfectly reasonable. The ladder’s top rung is the only guard, and it is a blunt one.
- The target does not recoil
- The nucleus is treated as infinitely heavy and perfectly fixed, which is a good approximation for the heavy end of the target ladder and a worse one the lighter the target gets. Aluminium is the lightest rung the lab offers and therefore the weakest case on the panel. No correction for it is applied anywhere, and no figure for the size of that correction is printed or estimated.
- No electrons, and therefore no screening
- The target’s electrons are simply absent from the model. That is tolerable for the large deflections this lab is interesting for, which happen deep inside where the electrons would be. It is not tolerable out at the shallow end of the aim ladder, where an alpha passing thousands of femtometres out would in reality be meeting a screened charge rather than a bare one.
- One encounter, not a foil — which is why no fraction of a beam is quoted here
- Everything on the panel describes a single alpha meeting a single nucleus once. A real foil is thousands of atoms thick, so small deflections accumulate and the single-encounter picture stops being honest below about 4.35 degrees by the cluster’s reference computation. No figure for what fraction of a beam does anything appears anywhere on this page, in any section or any table, because that calculation needs inputs this lab does not have.
- Relativity is left out, and the cost lands on the speed only
- The speed row runs from
2.32% of cat the bottom of the energy ladder to10.36% of cat the top, and it is worked out without relativity. The cluster’s reference computation puts the error at 0.40 per cent at the top rung and smaller everywhere below. Not one of the 1008 angles this lab can reach moves by a digit because of it. The first card is set by a ratio of two lengths, and the Rutherford length in that ratio is built out of the energy you set rather than out of any speed, so the approximation touches the speed row and stops there. - The paths are classical, and the ladders are ladders
- The alpha is treated as a particle on a definite trajectory with a definite aim, which is not what a quantum particle does; this lab makes no claim about why the relation survives that treatment as well as it does. Separately, the three sliders reach exactly 1008 states and nothing between them, so the aim that gives exactly ninety degrees cannot be loaded here at all. The Rutherford scattering calculator takes typed figures and will land on it.
- Where this model stops being the right model
- An atom built this way is classically unstable, because an orbiting electron radiates and spirals in, and that is why the successor account had to be built — the guide to what came next is where it belongs. Nothing in this panel models an electron at all. How the whole picture of the atom was assembled, and the counting of protons, neutrons and electrons that goes with it, is the atomic structure guide.
Where Scattering Is Actually Used
- Putting a ceiling on where an atom keeps its positive charge
- Load Aim dead centre at gold and read the second card against the bottom band. The closest approach is
45.50 fmand the model atom marker sits several clear decades further out along the same logarithmic axis, with nothing drawn in between, so the charge that turned the alpha round is confined to a tiny part of the atom holding it. That is the whole of what one dead-centre hit establishes, and it is a bound rather than a size. - Deciding what energy a tighter bound would cost
- The head-on row is inversely proportional to the energy, so the bound tightens exactly in step with it:
227.51 fmat1.0 MeV,45.50 fmat5.0 MeV,22.75 fmat10.0 MeVand11.38 fmat20.0 MeV. Walking the energy ladder with the aim at zero is the fastest way to see what a given bound would take. It is also the fastest way to see how quickly the returns diminish. - Comparing two targets without changing anything else
- Hold
5.0 MeVand20.00 fmand walk the target ladder: aluminium gives21.21°, gold gives97.36°and uranium gives105.91°. The head-on row behind them moves from7.49 fmto45.50 fmto52.99 fm, in direct proportion to the charge. A heavy target is a better backscatterer for a reason you can read off two rows. - Working out which deflections are worth counting and which are not
- The fourth card is a budget. On the aim ladder at
5.0 MeVon gold it reads0.25at180.00°and9.33e+9at0.26°, so nearly everything a beam does is a shallow deflection and the interesting events are buried under it by ten orders of magnitude. Any counting experiment has to be designed around that ratio rather than around the angle. - Turning a measured angle back into how close something came
- The panel runs forwards only: you set an aim and read an angle. A real measurement has the angle and wants the aim, and that inverse is what the Rutherford scattering calculator is for. The pairing matters, because the gap between the aim and the closest approach is large at shallow angles — at
2000.00 fmon gold the alpha still only reaches2022.88 fm. - Recognising the same shape of problem elsewhere
- An inverse-square repulsion, a hyperbolic path and one length that fixes the entire geometry is a pattern rather than a fact about nuclei. The head-on row is nothing but a potential-energy balance solved for a separation, which is why the electric potential guide is the nearest relative of this panel, and why the kinetic energy guide is where the quantity on the energy slider is defined.
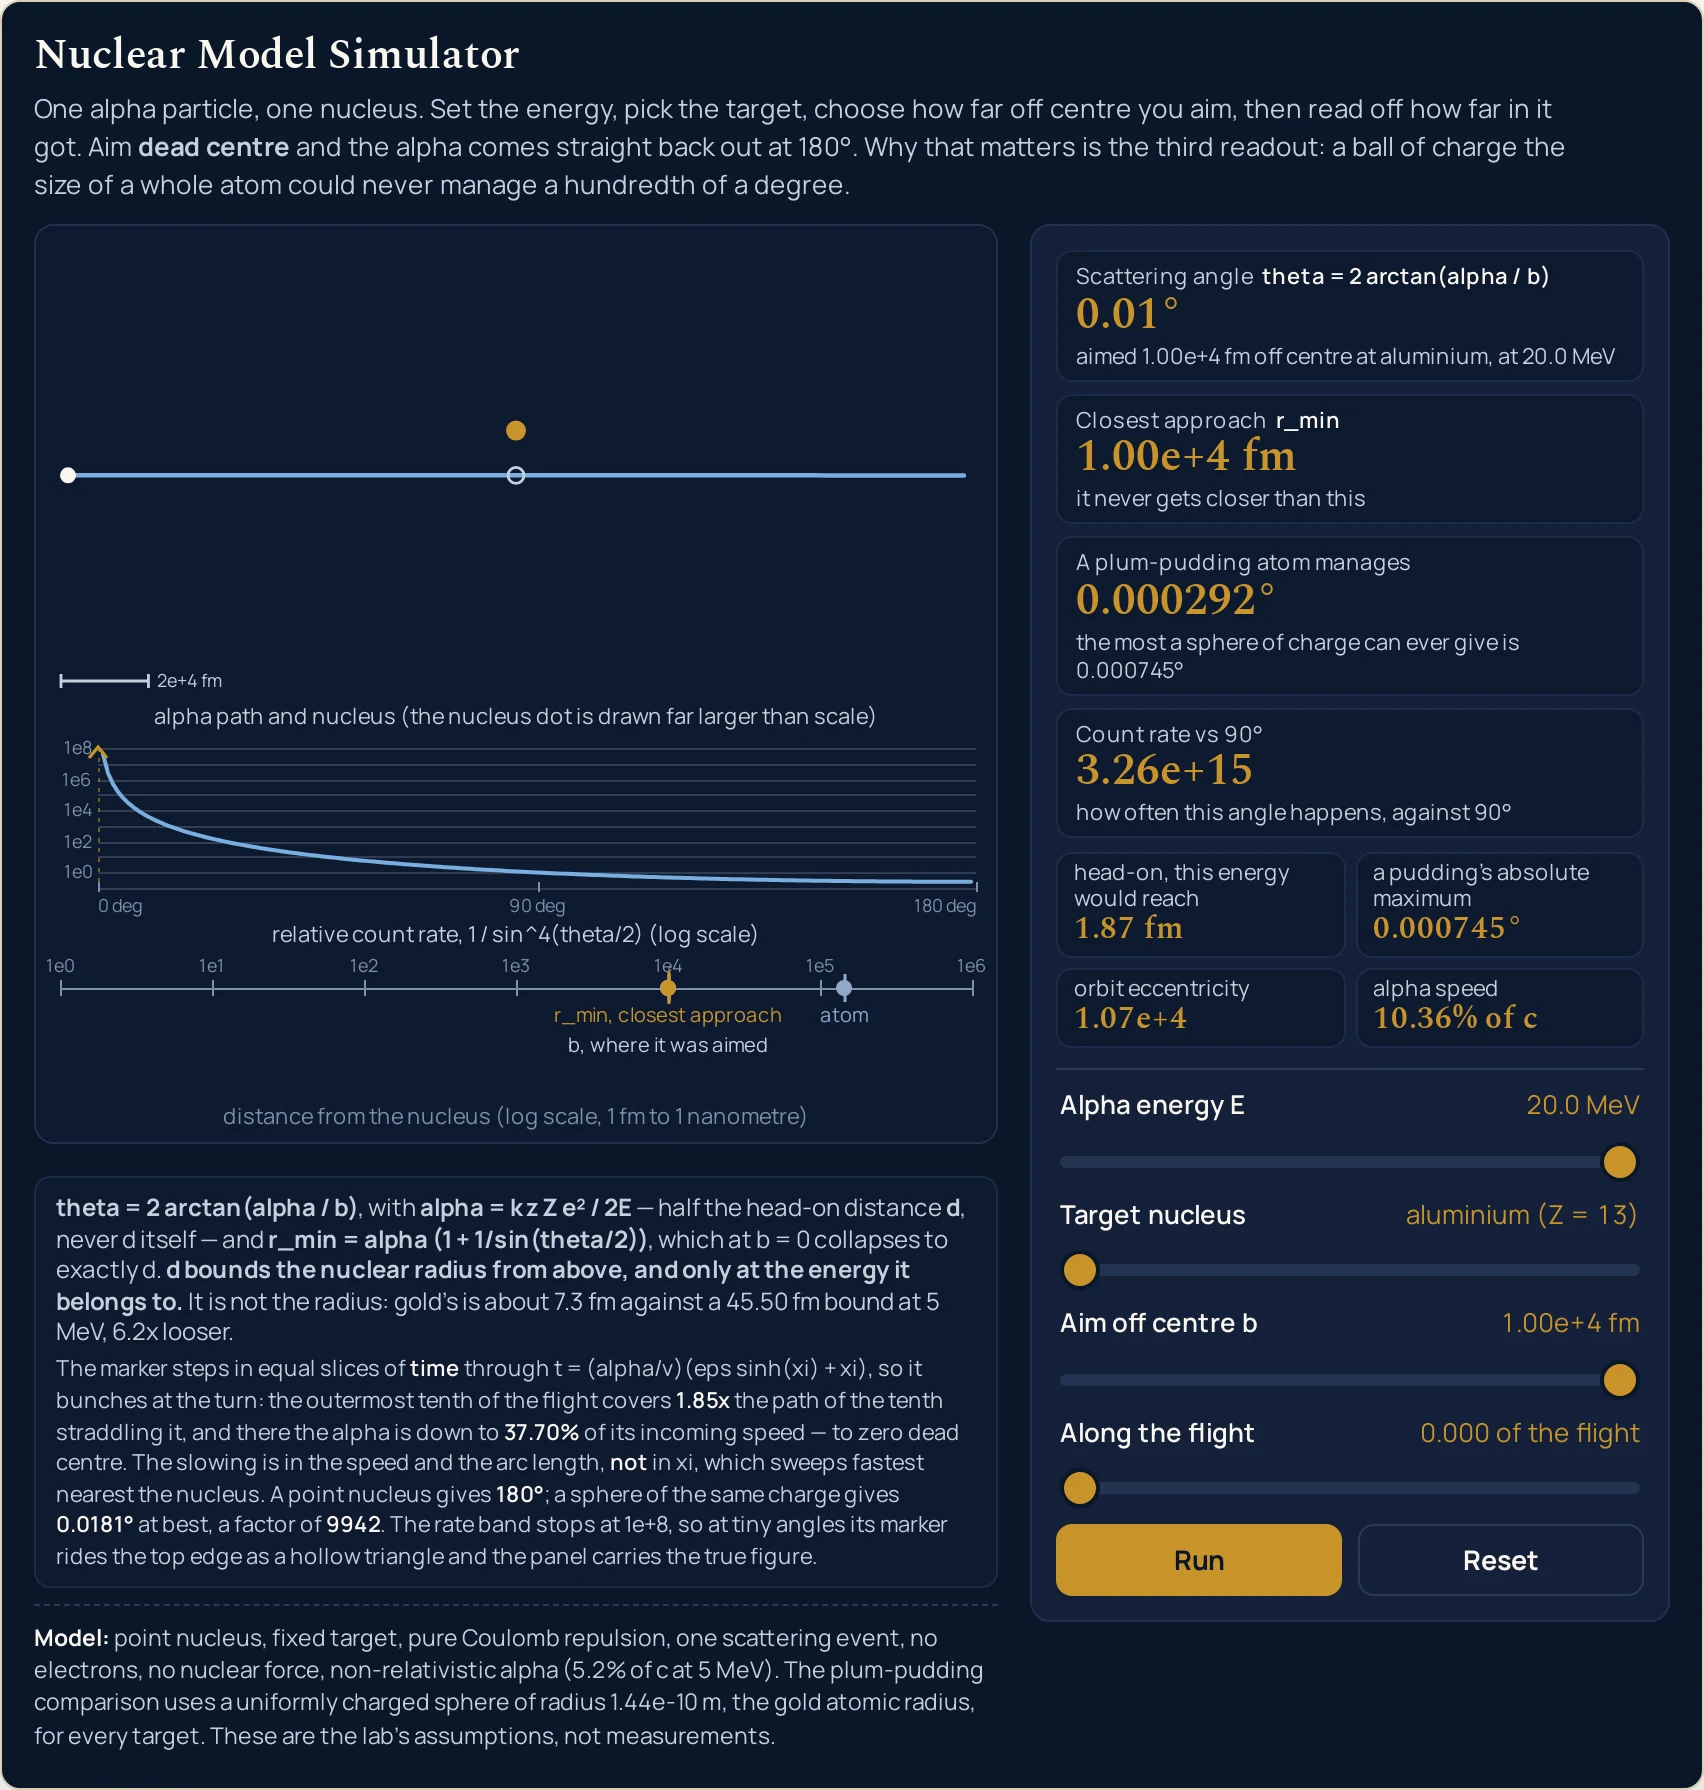
3.26e+15 and the band stops at 1e+8, so the marker clamps to the top edge and switches from a disc to a hollow triangle rather than pretending to sit on the curve. Note too that the aim and the closest approach have converged on the same tick: at 0.01° the alpha barely notices the nucleus is there.Where to Go Next
A panel can put you in a state and let you move one thing at a time, and that is the end of what a panel is for. The nuclear model guide is where the subject itself is written out: the argument against a spread-out atom made in full, the collapse of the count rate explained, and problems with every step shown.
Two posts sit either side of this one. The atomic structure guide is the wider story of how the picture of the atom was assembled and where protons, neutrons and electrons sit in it, and the guide to what came next is the account that replaced this one.
Four more pick up what this lab uses but does not explain. The Coulomb's law guide is the force law underneath every figure here, the electric potential guide is where the energy-to-distance step comes from, the conservation of energy guide is the step that gives the head-on distance, and the kinetic energy guide is the energy the alpha arrives with. The alpha decay guide is where the probe comes from, and the types of radiation guide is where it sits among the others.
On the tool side, the Rutherford scattering calculator takes typed energies, charges, aims and angles and runs the relation in all three directions, the Coulomb’s law calculator gives the force at a separation, the electric potential calculator gives the potential that sets the turning point, and the alpha decay calculator gives the energy a source emits. The Coulomb’s law simulator, the atomic structure simulator and the alpha decay simulator are the three neighbouring pictures. Beyond them there is the simulation library, an index of calculators, and the blog for everything written out at length.
Frequently asked questions
Why does the aim slider step through fixed rungs instead of moving smoothly?
Because a ladder makes every state reproducible and the two exact cases land on real rungs. The aim slider picks one of 14 fixed distances, the energy slider one of 12 and the target slider one of 6, so the lab has 1008 reachable states and any reading quoted on this page can be returned to rather than approached. The companion calculator takes typed figures instead.
Why does the angle read exactly 180.00 degrees at dead centre rather than something near it?
Because dead centre is handled by its own branch and never by a division. At an aim of 0.00 fm the lab returns a straight-back deflection outright, so the first card reads 180.00 degrees and the closest-approach card prints the same string as the head-on grid row. All 72 head-on states of the grid behave identically, at every energy and on every target.
Why does the third card refuse to move when I drag the aim?
Because that card compares two whole atoms rather than two aims, and the aim is not in it. It answers what a single sphere of charge spread over the whole atom could manage at this energy on this target, so it changes when you move the energy or the target slider and at no other time. Run the aim ladder end to end at 5.0 MeV on gold and it reads 0.00711 degrees on all fourteen rungs.
Why does the marker in the middle band sometimes become a hollow triangle?
Because the rate has gone off the top of that axis and the lab says so rather than drawing a lie. The curve is plotted over nine decades, and 202 of the 1008 reachable states sit above the highest of them, so on those the marker clamps to the top edge and switches from a disc to a hollow outline. The fourth card still prints the true figure.
Why is the nucleus drawn so much larger than it should be?
Because at every scale this drawing uses, an honest nucleus would be smaller than one pixel. The scale bar in that band is labelled in femtometres and rescales by four orders of magnitude across the aim ladder, so the dot marks where the nucleus is and never how big it is. The band caption carries that warning at every width the lab is drawn at.
Does pressing Run prove anything about the angle?
No. Run advances the flight slider and nothing else, so the path, the angle and all four cards are already decided before the first frame is drawn. The animation is the computed trajectory being traced out rather than evidence that it is the right one. What it does show honestly is where the alpha spends its time, because the marker steps in equal slices of time rather than of the path.
What happens if I press Run again once the flight has finished?
It rewinds to the start and replays. The button animates the flight slider to 1.000 of the flight, stops itself there and flips its own label back to Run, leaving nothing in flight; a second press from that position sends the slider back to zero and runs it again. Pressing Run while one pass is already in flight adds no second pass.
Why is the closest approach always further out than the head-on grid row?
Because any aim other than dead centre curves the alpha away before it can get that deep. The head-on row is what this energy would reach on a perfect central hit, and the closest-approach card is what this particular aim reaches, so the second is larger everywhere except at an aim of 0.00 fm, where the two print the same string. That ordering holds on all 1008 states.
References & formula source
- The model behind every figure on this page is the classical scattering of one alpha particle by one nucleus under pure electrostatic repulsion, with the charge of the target treated as sitting at a single mathematical point. The path that follows is a hyperbola with the nucleus at its outer focus, and all of its geometry is fixed by one length, the Rutherford length, which is half the head-on distance of closest approach. Everything the panel prints is that single picture read in a different place.
- Seven things are this lab's STATED ASSUMPTIONS and not measurements of any atom, and the panel prints them in a fixed line under the drawing: the nucleus is a point, it is infinitely heavy and does not recoil, the repulsion is pure and unscreened with no electrons present, there is one scattering event and not a foil, there is no nuclear force in the relation, the alpha is treated non-relativistically, and the trajectory is classical. The plum-pudding comparison additionally holds the sphere radius at the gold atomic radius for all six targets, which the same line states outright.
- The head-on distance is the figure most often misquoted on this subject and the lab prints its own warning about it. It is an UPPER BOUND on the nuclear radius and it is a bound only for the energy that produced it: the alpha turned round there under electrostatic repulsion alone, so all of the positive charge is somewhere inside it. It is not a radius, not a diameter and not a measurement of a nucleus, and quoting one without the energy beside it says nothing at all.
- Nothing in this lab is measured. The energy, the target and the aim are given, the angle and both distances follow from the relation, and the marker on the drawn path is the computed trajectory being traced out rather than evidence for it. What the three ladders are genuinely for is the opposite job: holding two quantities still, moving the third, and watching which reading moves with it and which does not.
- The drawing promises three things and refuses a fourth. The path band draws a trajectory with a labelled scale bar, the rate band draws a dimensionless ratio on a logarithmic axis, and the distance band draws one shared logarithmic length axis anchored on its decades. No length in one band means anything in another, the three are labelled separately, and no sentence on this page invites comparing them. The nucleus dot in the path band is drawn far larger than scale and its caption keeps saying so at every width.
- Every figure quoted on this page is a string the simulation printed, with five stated exceptions that are attributed in the prose to the cluster's own reference computation rather than to the panel. The cluster's simulation report is where those strings are recorded, and it is not a sample: it harvests all 1008 reachable ladder states, the five presets at four instants each, both ends of all four sliders, the four corners of the grid, both exact-by-construction states and the opening state, from a real browser. The independent reference script, written separately from the simulation, runs 58,767 checks against the same relations with none failing.
- The three ladders are a modelling decision with consequences worth stating. Because the energy takes twelve fixed values, the target six and the aim fourteen, the lab has exactly 1008 reachable states and nothing between them, so every census quoted on this page is a count rather than an estimate. It also means the exact ninety-degree case is not reachable from the sliders at all, because the aim that produces it is not on a rung; the page says so where it matters, and the companion calculator takes typed figures for that.
- Two browser engines were compared reading by reading rather than assumed to agree: the same slider positions were driven in Chrome and in Firefox at four widths and 119 readout values were compared per width, every one identical, with the desktop height agreeing to the pixel. There is a hole in that and it is Safari. The WebKit build on the machine this was tested on will not start without system access it has not been given, so Safari was never exercised and nothing on this page is evidence about it.
- Where this page gives a figure that the panel cannot print, it says so in the sentence that carries it. Five such figures appear: how much looser the twenty-megaelectronvolt bound is than the real gold nuclear radius, the empirical radius relation's own answer for gold, the energy at which the head-on distance would reach that radius, the angle below which a thin-foil single-scattering estimate stops being honest, and the size of the error the non-relativistic speed carries at the top of the ladder. Each is the cluster's reference computation rather than a panel reading, and each should be verified before it is used anywhere that matters.
- Further reading: Rutherford scattering — Wikipedia