A concave and convex lens are the two basic types of thin lens that bend light in opposite ways: a convex (converging) lens is thicker in the middle and focuses parallel rays to a point, while a concave (diverging) lens is thinner in the middle and spreads rays apart. Both obey the lens formula 1/f = 1/v − 1/u.
Pick up a magnifying glass and hold it over a page. The letters swell. Tilt it toward the sun and it will burn a tiny dot into the paper. Now think of the peephole in a front door — the whole hallway shrinks into one little fisheye view. Same idea, opposite effect.
Both tricks come down to a single curved piece of glass or plastic. One kind of lens pulls light together; the other pushes it apart. Learn which is which and the rest of optics — cameras, spectacles, telescopes, even your own eyes — starts to make sense.
What Are Concave and Convex Lenses?
A lens is simply a shaped piece of transparent material that bends light in a controlled way. Change the curve of its surfaces and you change where the light ends up.
Convex lens (converging)
A convex lens bulges outward — it is thicker in the middle than at its edges. When parallel light passes through, the lens bends every ray toward the centre line, so the rays meet at a single point called the focal point. Because it gathers light to a point, a convex lens is also called a converging lens.
Hold one up to a distant window and you can catch a small, upside-down picture of the view on a card behind it. That is light converging.
Concave lens (diverging)
A concave lens caves inward — it is thinner in the middle than at its edges. Parallel light passing through spreads apart, as though it were fanning out from a point behind the lens. That spreading is why a concave lens is called a diverging lens.
Look through one and everything appears smaller and further away. It can never focus the sun to a burning point, no matter how you angle it.

A convex lens converges parallel light to a real focal point; a concave lens diverges it, so the rays only appear to come from a virtual focal point.
Here is a memory hook that sticks: a con-cave lens caves in, so it spreads light. A convex lens is the opposite — it bulges out and gathers light. Caved-in glass diverges; bulging glass converges.
Concave vs Convex Lens: 7 Key Differences
The two lenses are near-mirror opposites. This table lines up the seven differences that matter most in class and in exams.
| Feature | Convex lens | Concave lens |
|---|---|---|
| Shape | Thicker in the middle, bulges outward | Thinner in the middle, caves inward |
| Effect on parallel light | Converges rays to a real focal point | Diverges rays; they appear to come from a virtual focal point |
| Other name | Converging lens | Diverging lens |
| Focal length sign | Positive (+f) | Negative (−f) |
| Power sign | Positive (measured in +dioptres) | Negative (−dioptres) |
| Image of a real object | Real or virtual, depending on distance; can be inverted and magnified, or upright and magnified | Always virtual, upright and diminished |
| Typical uses | Magnifying glass, cameras, projectors, the eye, long-sight correction | Peepholes, short-sight correction, laser beam expanders, telescope elements |
The Lens Formula
One equation ties together where the object sits, where the image lands, and the strength of the lens. It works for both lens types — as long as you keep the signs straight.
Each symbol has a precise meaning and, in SI units, is measured in metres:
- f — focal length of the lens (metres, m). It is positive for a convex lens and negative for a concave lens.
- v — image distance from the centre of the lens (metres, m). Positive when the image forms on the far side of the lens (a real image); negative when it forms on the same side as the object (a virtual image).
- u — object distance from the centre of the lens (metres, m). For a normal real object it is taken as negative under the Cartesian sign convention.
Two partner equations finish the toolkit. Magnification compares image size to object size:
- m — magnification (no units). Negative means the image is inverted; positive means it is upright.
- h — object height (m); h’ — image height (m).
The power of a lens tells you how strongly it bends light:
- P — power in dioptres (D), where 1 D = 1 m−1, with f in metres. Convex lenses have positive power; concave lenses have negative power.
The sign convention that keeps you out of trouble
Signs are where most mistakes happen. The New Cartesian sign convention keeps them consistent:
- Measure every distance from the centre of the lens.
- Distances measured in the direction the light travels are positive; those against it are negative.
- A real object on the incoming side gives a negative u.
- Heights above the principal axis are positive; below it, negative.
The quickest way to catch a sign error is a sanity check. A distant object viewed through a convex lens must give a small real image just past the focal point — if your arithmetic disagrees, a sign has slipped.
Georgia State University’s HyperPhysics gives a clear reference for the full thin-lens sign convention. Prefer to skip the arithmetic? Check any lens problem in seconds with our Lens & Mirror Calculator — just note that some textbooks write the same relationship with the signs arranged differently, so read the convention it uses.
How Concave and Convex Lenses Work
Lenses bend light because light slows down when it enters glass. The deeper reason is refraction: a ray changes direction whenever it crosses between two materials in which it travels at different speeds.
How much a material slows light is measured by its refractive index, n — the speed of light in a vacuum divided by its speed in the material. Glass sits at about 1.5, so light crawls through it at roughly two-thirds of its vacuum speed. (For more on that vacuum speed, see our guide to the speed of light.)
At a curved surface, different parts of the beam strike the glass at different angles, so they bend by different amounts. A convex surface swings the outer rays inward; a concave surface swings them outward. The combined curve of the two faces decides whether the lens converges or diverges the light.
The exact focal length depends on the curvature of both surfaces and the refractive index, captured by the lensmaker’s equation:
- n — refractive index of the lens material (no units).
- R1, R2 — radii of curvature of the first and second surfaces (m), each signed by the convention.
Make the surfaces more sharply curved, or use a material with a higher index, and the focal length shrinks — the lens grows more powerful. The full ray-tracing derivation is laid out in the OpenStax optics text on thin lenses.
How Images Form: Reading a Ray Diagram
Where does the image actually appear? You do not need the formula to find out — you can trace it. Three special rays leave the top of the object, and wherever they meet is where the image forms.
- Ray 1: travels parallel to the axis, then bends through the focal point on the far side.
- Ray 2: passes straight through the centre of the lens without bending.
- Ray 3: goes through the near focal point, then leaves parallel to the axis.
For a convex lens with the object beyond twice the focal length, the three rays cross on the far side. The image there is real — you could catch it on a screen — and it is inverted and smaller than the object.

Convex lens, object beyond 2F: the three rays cross to form a real, inverted, diminished image between F and 2F on the far side.
A concave lens tells a different story. The rays spread apart after passing through, so they never truly meet. Trace them backward, though, and their extensions cross on the same side as the object. That crossing marks a virtual image — upright, smaller, and impossible to project.
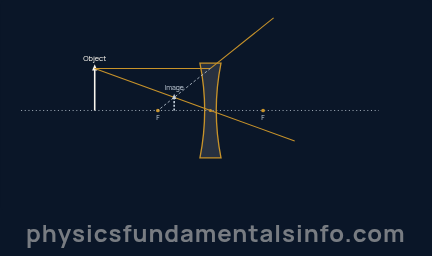
Concave lens: the diverging rays are traced back (dashed) to a virtual, upright, diminished image between the lens and its focal point.
For a convex lens, the object’s distance changes everything. This table sums up every case:
| Object position | Image position | Nature of image |
|---|---|---|
| At infinity | At F | Real, inverted, point-sized |
| Beyond 2F | Between F and 2F | Real, inverted, diminished |
| At 2F | At 2F | Real, inverted, same size |
| Between F and 2F | Beyond 2F | Real, inverted, magnified |
| At F | At infinity | No clear image (rays emerge parallel) |
| Between F and the lens | Same side as the object | Virtual, upright, magnified |
A concave lens has no such variety. Wherever you place a real object, the image is always virtual, upright, diminished, and tucked between the focal point and the lens.
Real-World Examples of Concave and Convex Lenses
You are surrounded by both types, often working together in the same device.
Convex lenses in action
- Your own eyes. The lens inside each eye is convex, focusing a real, inverted image onto the retina; your brain flips it the right way up.
- Cameras and phones. A converging lens system projects a real, inverted image onto the sensor. Shift the lens and you refocus.
- Magnifying glasses. Held close to an object, a convex lens produces an enlarged, upright, virtual image — the one everyday case where a convex lens magnifies.
- Projectors. A convex lens throws a large real image onto a screen, which is why slides and film are loaded upside down.
- Long-sight correction. Convex spectacle lenses add converging power for eyes that focus light behind the retina.
Concave lenses in action
- Door peepholes. A diverging lens squeezes a wide hallway into a small upright image, giving that fisheye view.
- Short-sight correction. Concave spectacle lenses spread light slightly before it reaches an eye that focuses too strongly, pushing the image back onto the retina.
- Laser and telescope optics. Concave elements expand beams and pair with convex lenses to sharpen images and cancel colour errors.

A convex lens brings parallel sunlight to a single focal point, concentrated enough to burn paper. A concave lens could never do this — it only ever spreads light out.
Common Misconceptions About Concave and Convex Lenses
“A convex lens always magnifies.”
Only when the object sits inside the focal length. Move the object beyond twice the focal length — as a camera does — and a convex lens produces a smaller image, not a bigger one.
“A concave lens can’t form an image.”
It always forms one; the image is simply virtual, upright and smaller than the object. You see it every time you look through the lens, even though it can never be caught on a screen.
“Concave means it bulges out.”
It is the reverse. A concave lens caves inward and spreads light; a convex lens bulges outward and gathers it. Swapping the two names is the single most common slip in optics.
“Thicker glass always bends light more.”
Curvature and refractive index set the power, not raw thickness. A thin, steeply curved lens can be far stronger than a thick, gently curved one.
How Lenses Relate to Light, Waves and Mirrors
Lenses are one corner of a much bigger picture. They work on light, and light is an electromagnetic wave — a transverse one, in which the oscillations sit at right angles to the direction of travel. (If that distinction is new, our explainer on transverse vs longitudinal waves unpacks it.)
Because a lens bends different colours by slightly different amounts, its focal length depends on wavelength. Shorter-wavelength violet light bends a touch more than red, smearing white light into coloured fringes called chromatic aberration. Wavelength and colour are two sides of one coin, as our piece on the frequency formula shows.
Lenses also have a close cousin: mirrors. A concave mirror converges light and a convex mirror diverges it — the reverse pairing to lenses, because mirrors reflect light rather than refract it. A similar 1/f relationship describes both, each with its own sign rules.
Worked Problems
Show Solution
Solution:
Step 1: Use the lens formula 1/f = 1/v − 1/u, rearranged to 1/v = 1/f + 1/u.
Step 2: Substitute f = +10 cm and u = −30 cm: 1/v = 1/10 + 1/(−30) = 3/30 − 1/30 = 2/30.
Step 3: 1/v = 1/15, so v = +15 cm. Magnification m = v/u = 15 / (−30) = −0.5.
Answer: v = +15 cm; m = −0.5. The image is real, inverted and half the size of the object.
Show Solution
Solution:
Step 1: 1/v = 1/f + 1/u, with f = +15 cm and u = −10 cm.
Step 2: 1/v = 1/15 + 1/(−10) = 2/30 − 3/30 = −1/30.
Step 3: v = −30 cm. Magnification m = v/u = −30 / (−10) = +3.
Answer: v = −30 cm; m = +3. The image is virtual, upright and three times larger — exactly how a magnifying glass works.
Show Solution
Solution:
Step 1: 1/v = 1/f + 1/u. For a concave lens f is negative, so f = −20 cm and u = −30 cm.
Step 2: 1/v = 1/(−20) + 1/(−30) = −3/60 − 2/60 = −5/60.
Step 3: 1/v = −1/12, so v = −12 cm. m = v/u = −12 / (−30) = +0.4.
Answer: v = −12 cm; m = +0.4. The image is virtual, upright and diminished — the only kind a concave lens makes.
Show Solution
Solution:
Step 1: A real image on a screen means v = +60 cm; the object gives u = −20 cm.
Step 2: 1/f = 1/v − 1/u = 1/60 − 1/(−20) = 1/60 + 3/60 = 4/60.
Step 3: 1/f = 1/15, so f = +15 cm. m = v/u = 60 / (−20) = −3.
Answer: f = +15 cm; m = −3. The image is real, inverted and three times larger than the object.
Show Solution
Solution:
Step 1: Use P = 1/f with f in metres.
Step 2 (a): f = +0.25 m, so P = 1 / 0.25 = +4 D.
Step 3 (b): f = −0.50 m, so P = 1 / (−0.50) = −2 D.
Answer: +4 D for the convex (converging) lens and −2 D for the concave (diverging) lens.
Show Solution
Solution:
Step 1: Lensmaker’s equation 1/f = (n − 1)(1/R1 − 1/R2). For a biconvex lens, R1 = +20 cm and R2 = −20 cm.
Step 2: 1/f = (1.5 − 1)(1/20 − 1/(−20)) = 0.5 × (1/20 + 1/20) = 0.5 × (2/20).
Step 3: 1/f = 0.5 × 0.1 = 0.05 cm−1, so f = 20 cm = +0.20 m.
Answer: f = +20 cm — a converging lens of power +5 D.
Show Solution
Solution:
Step 1: A real, magnified image is inverted, so m = −4. Since m = v/u, this gives v = −4u.
Step 2: Put this into 1/f = 1/v − 1/u: 1/10 = 1/(−4u) − 1/u = −1/(4u) − 4/(4u) = −5/(4u).
Step 3: Solve 1/10 = −5/(4u): 4u = −50, so u = −12.5 cm and v = −4u = +50 cm.
Answer: place the object 12.5 cm in front of the lens; the real, inverted image forms 50 cm away, four times larger.