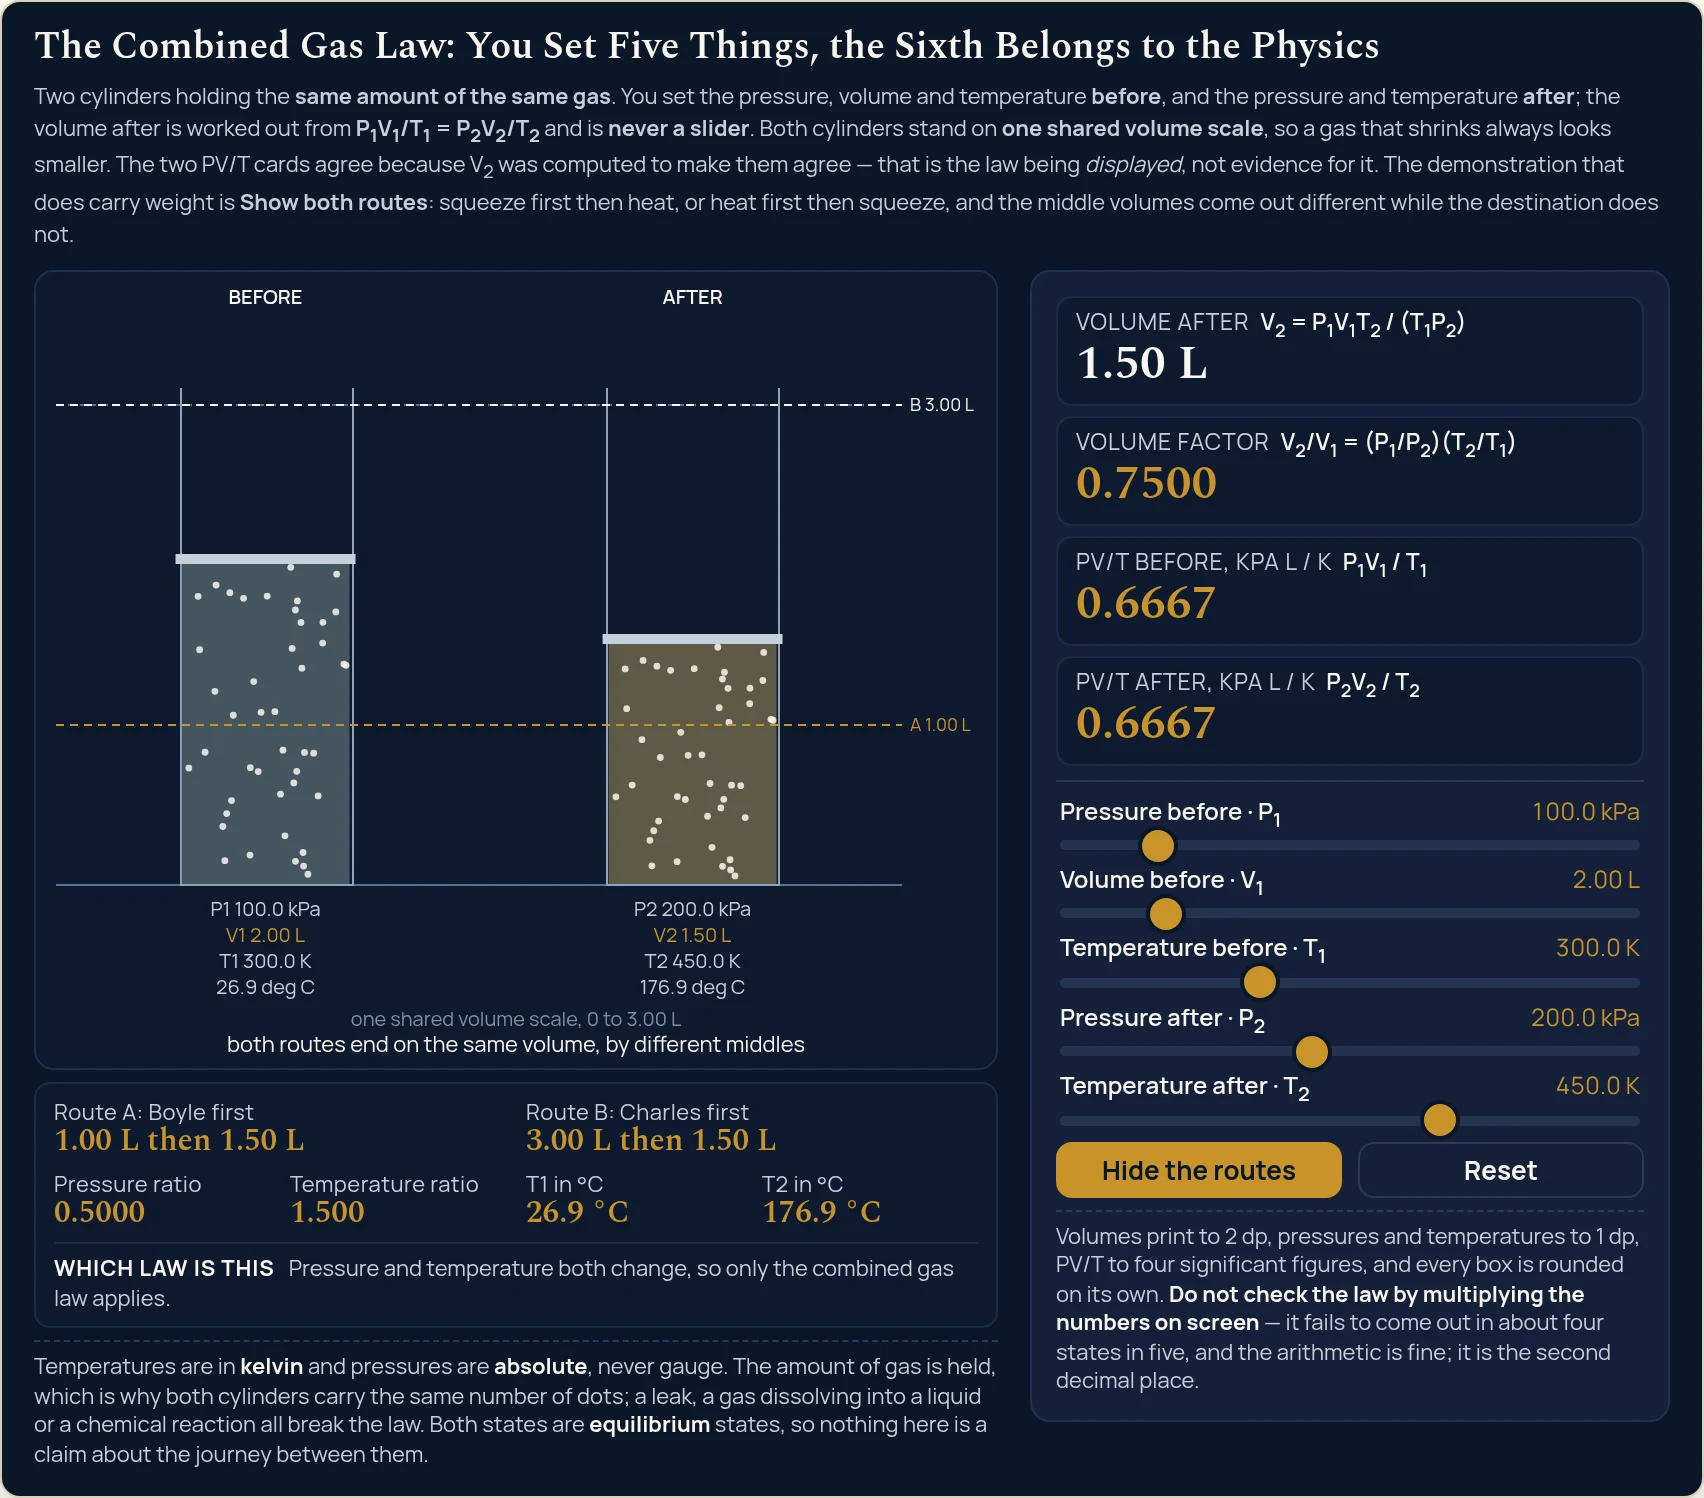
The combined gas law covers the case its three siblings each rule out, with the pressure and the temperature both on the move: for a sealed sample, P1V1/T1 = P2V2/T2. This lab draws that as two cylinders, a before and an after, on one shared volume scale. Five sliders are yours — the pressure, volume and temperature at the start, then the pressure and temperature at the end — while the sixth quantity, the volume after, is worked out rather than set. Four cards report it beside the volume factor and the two PV/T figures, and Show both routes draws the two different middles you pass through.
The Combined Gas Law: You Set Five Things, the Sixth Belongs to the Physics
Two cylinders holding the same amount of the same gas. You set the pressure, volume and temperature before, and the pressure and temperature after; the volume after is worked out from P1V1/T1 = P2V2/T2 and is never a slider. Both cylinders stand on one shared volume scale, so a gas that shrinks always looks smaller. The two PV/T cards agree because V2 was computed to make them agree — that is the law being displayed, not evidence for it. The demonstration that does carry weight is Show both routes: squeeze first then heat, or heat first then squeeze, and the middle volumes come out different while the destination does not.
Route A: Boyle first1.00 L then 1.50 L
Route B: Charles first3.00 L then 1.50 L
Pressure ratio0.5000
Temperature ratio1.500
T1 in °C26.9 °C
T2 in °C176.9 °C
Which law is thisPressure and temperature both change, so only the combined gas law applies.
Temperatures are in kelvin and pressures are absolute, never gauge. The amount of gas is held, which is why both cylinders carry the same number of dots; a leak, a gas dissolving into a liquid or a chemical reaction all break the law. Both states are equilibrium states, so nothing here is a claim about the journey between them.
Volume after V2 = P1V1T2 / (T1P2)
1.50 L
Volume factor V2/V1 = (P1/P2)(T2/T1)
0.7500
PV/T before, kPa L / K P1V1 / T1
0.6667
PV/T after, kPa L / K P2V2 / T2
0.6667
Pressure before · P1100.0 kPa
Volume before · V12.00 L
Temperature before · T1300.0 K
Pressure after · P2200.0 kPa
Temperature after · T2450.0 K
Volumes print to 2 dp, pressures and temperatures to 1 dp, PV/T to four significant figures, and every box is rounded on its own. Do not check the law by multiplying the numbers on screen — it fails to come out in about four states in five, and the arithmetic is fine; it is the second decimal place.
Load a real before and after
Each button presses the lab's own Reset and then writes all five sliders, so every load starts from the same place. The second one also presses Show both routes, because that picture is off until you ask for it. Watch the status line as you move down the list: the same panel names four different laws without any of the controls changing what they do.
Pick a change above, or drag the sliders yourself.
What Is the Combined Gas Law Simulator?
The combined gas law simulator is a free interactive physics lab that runs in your browser, with nothing to install and no sign-up. Two cylinders stand side by side on one shared volume scale, labelled before and after, holding the same sealed sample of gas. Five sliders set the pressure from 50 to 400 kPa, the volume from 0.5 to 10.0 L and the temperature from 150 to 600 K at the start, then the pressure and temperature at the end.
The volume after is never a slider. It is worked out from P1V1/T1 = P2V2/T2 and printed as Volume after, beside the volume factor, the two PV/T figures, the pressure and temperature ratios and both temperatures in Celsius. A status line names which of the four gas laws the current setting reduces to, and Show both routes draws the two different middle volumes you pass through going one way round or the other.
| Control | Range | Step |
|---|---|---|
| Pressure before | 50 to 400 kPa | 5 kPa |
| Volume before | 0.5 to 10.0 L | 0.5 L |
| Temperature before | 150 to 600 K | 5 K |
| Pressure after | 50 to 400 kPa | 5 kPa |
| Temperature after | 150 to 600 K | 5 K |
| Show both routes | draws two levels | one button |
| Reset | restores the opening state | one button |
How to use the combined gas law simulator
- Start from the opening state, or load one above. Reset puts the sliders back to 100 kPa, 2.0 L and 300 K going to 200 kPa and 450 K, and it also puts the route lines away. Nothing in the panel is stored text: every figure is worked out again the moment a slider moves.
- Describe the gas before the change. Pressure before · P1 runs from 50 to 400 kPa in 5 kPa steps, Volume before · V1 from 0.5 to 10.0 L in half-litre steps, and Temperature before · T1 from 150 to 600 K in 5 K steps. The left-hand cylinder redraws as you go.
- Read the pressures as absolute. Every pressure here is measured from a vacuum, not from the surrounding air, because the law wants a ratio whose zero is the real one. A tyre gauge or a dial gauge reads the excess over the atmosphere, so a reading of 220 kPa on one of those is 321.325 kPa absolute.
- Set where the gas ends up. Pressure after · P2 and Temperature after · T2 cover the same ranges as their partners. There is deliberately no slider for the volume after: that is the quantity the law is going to hand you, and letting you set it too would let you describe a state that cannot exist.
- Note that both temperatures are in kelvin. A Celsius slider crossing zero would put a negative number into a ratio, so the lab prints the Celsius equivalent as text instead — 300.0 K shows as 26.9 °C beside it. The account of absolute zero explains why that scale stops where it does and why a ratio needs it.
- Read the four cards. Volume after is the answer, in litres to two decimal places. Beneath it sit Volume factor, then PV/T before and PV/T after, each to four significant figures. The two PV/T cards will agree, and the section on the physics below explains why that is worth nothing as a check.
- Read the strip under the drawing. It carries both route sentences with their middle volumes, the pressure and temperature ratios to four significant figures, and both temperatures in degrees Celsius to one decimal place. Those two route figures are on screen whether or not the picture is.
- Press Show both routes to see them drawn. Two dashed levels appear across both cylinders at the middle volume you reach by squeezing first and at the different one you reach by warming first, labelled A and B, and the caption beneath changes to say that both routes end on the same volume. The button then reads Hide the routes.
- Read the status line last. Which law is this names the law your current setting reduces to, and it has five things it can say. Moving one slider until a ratio turns into one is the quickest way to watch the general law collapse into a particular one.
If only one of the three quantities is genuinely changing, this is not the lab you want. Hold the temperature and the Boyle's law lab shows the same squeeze with one fewer thing to think about; hold the pressure and the Charles's law lab does the same for warming. This page earns its place when both move at once, which is exactly the case those two forbid.
1.00 L and taking the temperature change first through 3.00 L, drawn here as the two dashed levels, and both finish on the 1.50 L the one-step answer gives. The shared scale reads 0 to 3.00 L rather than 0 to 2.00 L because it stretches to hold the higher of the two middles.Worked example: change one thing at a time
Every row below is one setting of the five sliders, and every cell is a string the running lab printed there. Rows 2, 3 and 4 move exactly one slider away from the opening change; the rest go looking for the corners and the awkward cases. Where a cell and the lab ever part company, believe the lab.
| Setting | Before | After | Volume after | Volume factor | PV/T before | PV/T after | Route A, Boyle first | Route B, Charles first |
|---|---|---|---|---|---|---|---|---|
| The opening change | 100.0 kPa · 2.00 L · 300.0 K | 200.0 kPa · 450.0 K | 1.50 L | 0.7500 | 0.6667 | 0.6667 | 1.00 L then 1.50 L | 3.00 L then 1.50 L |
| Hold the temperature | 100.0 kPa · 2.00 L · 300.0 K | 200.0 kPa · 300.0 K | 1.00 L | 0.5000 | 0.6667 | 0.6667 | 1.00 L then 1.00 L | 2.00 L then 1.00 L |
| Hold the pressure | 100.0 kPa · 2.00 L · 300.0 K | 100.0 kPa · 450.0 K | 3.00 L | 1.500 | 0.6667 | 0.6667 | 2.00 L then 3.00 L | 3.00 L then 3.00 L |
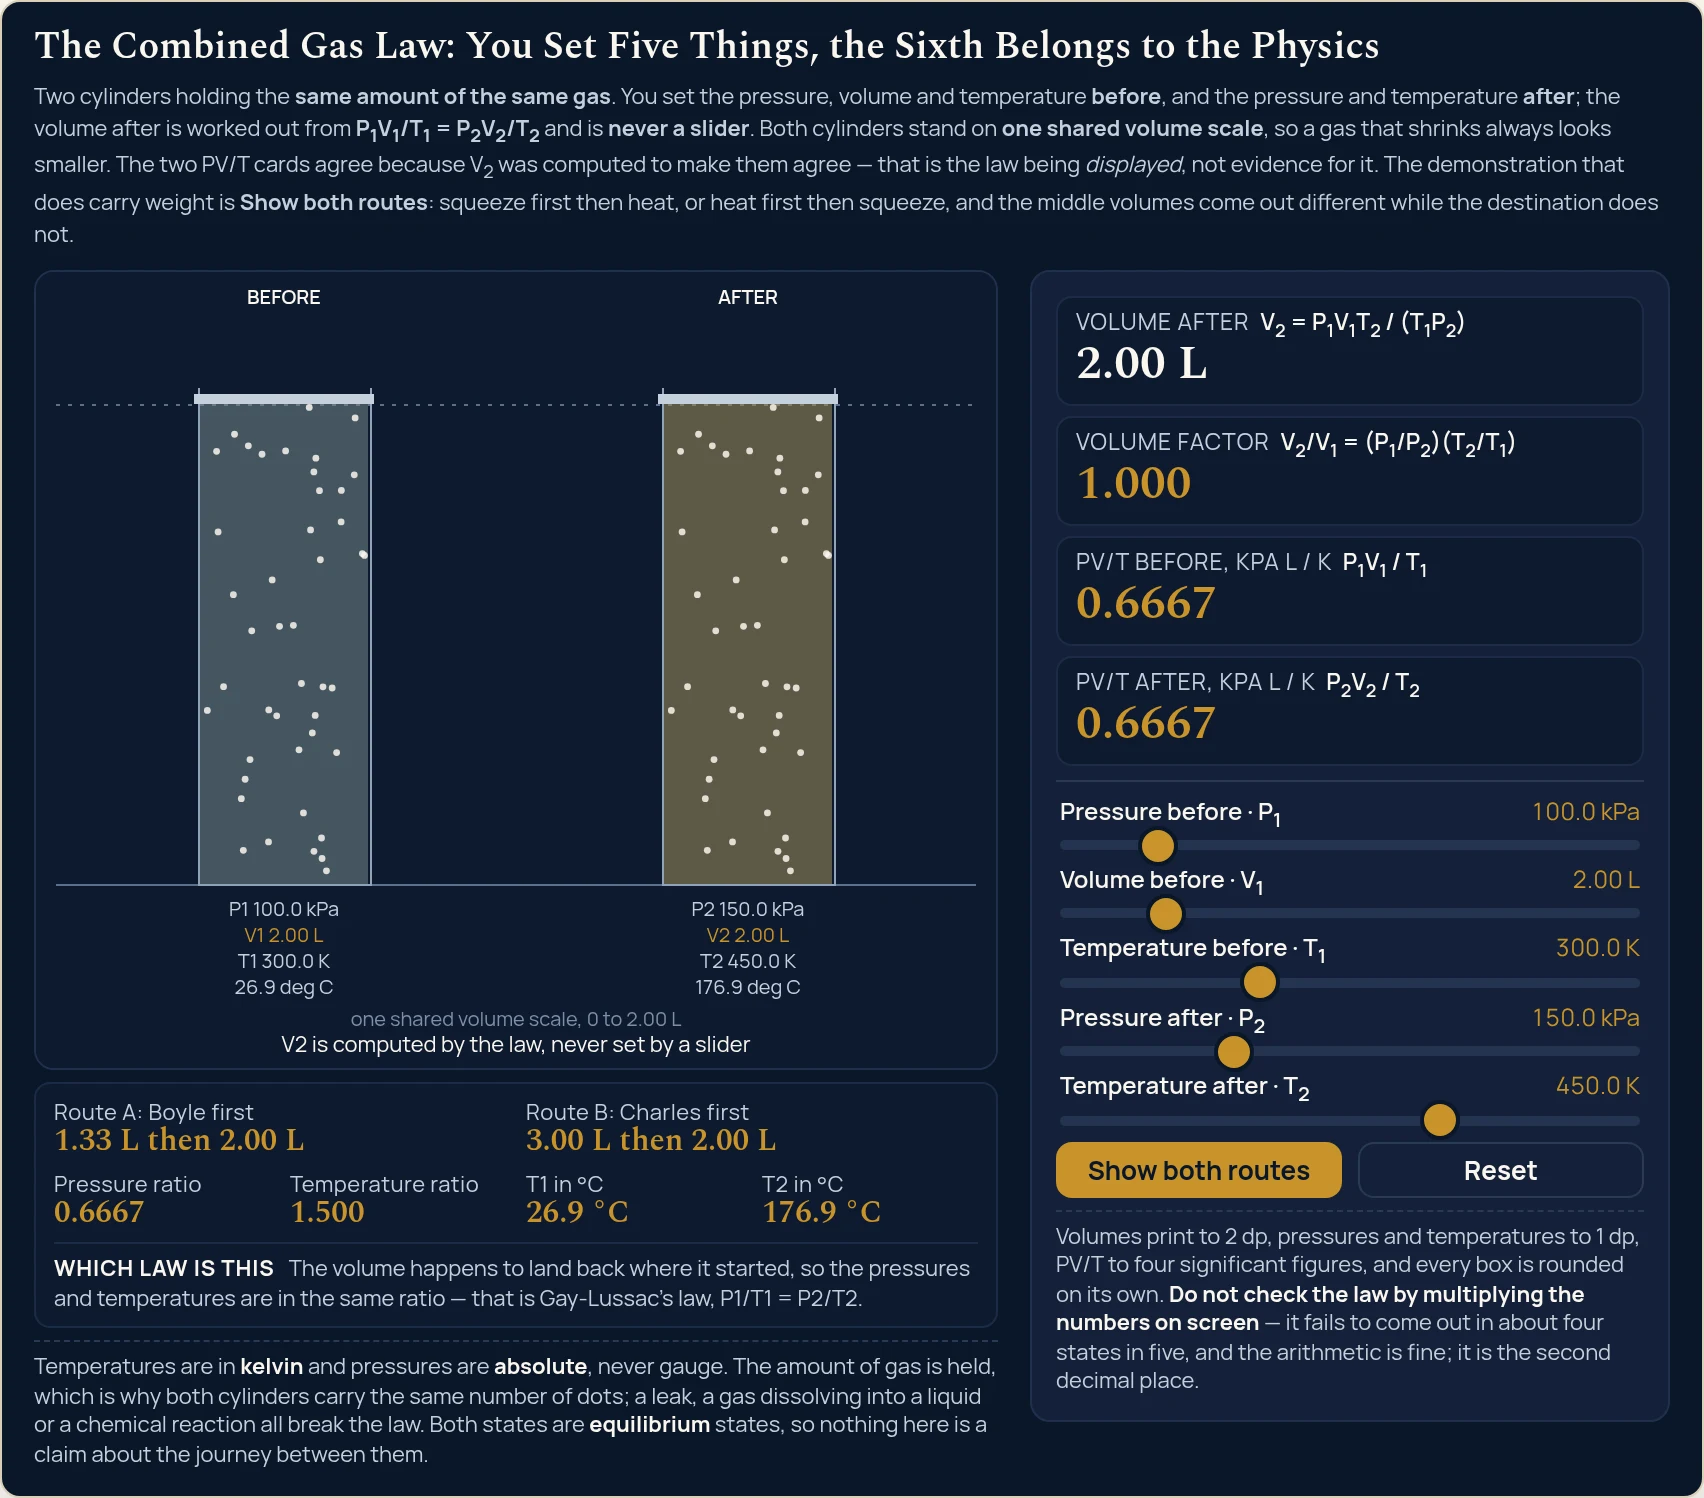
| The volume comes back | 100.0 kPa · 2.00 L · 300.0 K | 150.0 kPa · 450.0 K | 2.00 L | 1.000 | 0.6667 | 0.6667 | 1.33 L then 2.00 L | 3.00 L then 2.00 L |
| Squeeze and cool | 200.0 kPa · 4.00 L · 400.0 K | 400.0 kPa · 200.0 K | 1.00 L | 0.2500 | 2.000 | 2.000 | 2.00 L then 1.00 L | 2.00 L then 1.00 L |
| Expand and heat | 400.0 kPa · 1.00 L · 200.0 K | 100.0 kPa · 600.0 K | 12.00 L | 12.00 | 2.000 | 2.000 | 4.00 L then 12.00 L | 3.00 L then 12.00 L |
| A tiny sample | 100.0 kPa · 0.50 L · 300.0 K | 250.0 kPa · 600.0 K | 0.40 L | 0.8000 | 0.1667 | 0.1667 | 0.20 L then 0.40 L | 1.00 L then 0.40 L |
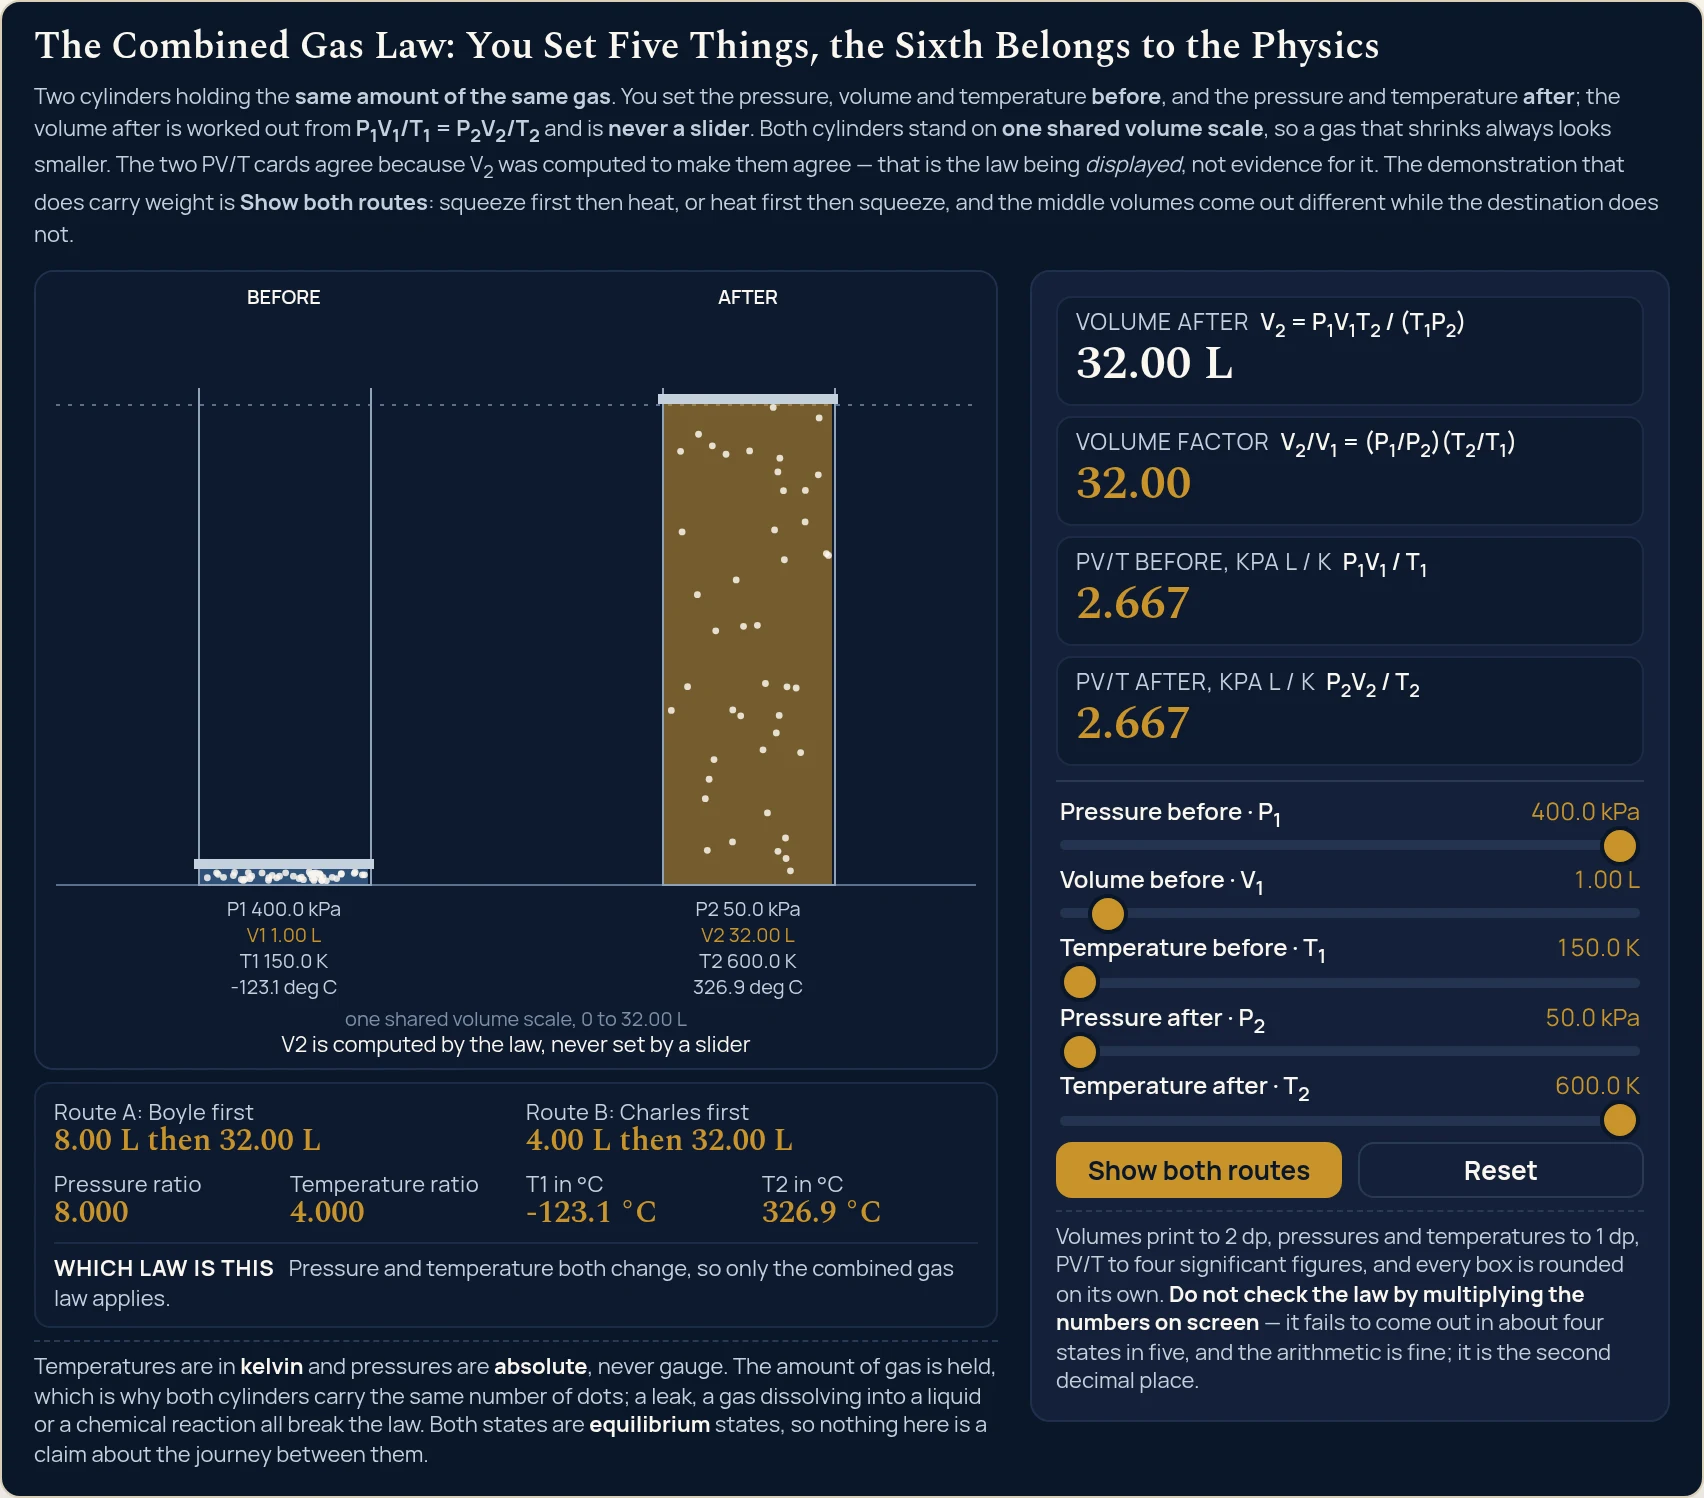
| The biggest expansion | 400.0 kPa · 1.00 L · 150.0 K | 50.0 kPa · 600.0 K | 32.00 L | 32.00 | 2.667 | 2.667 | 8.00 L then 32.00 L | 4.00 L then 32.00 L |
| The deepest squeeze | 50.0 kPa · 0.50 L · 600.0 K | 400.0 kPa · 150.0 K | 0.02 L | 0.03125 | 0.04167 | 0.04167 | 0.06 L then 0.02 L | 0.13 L then 0.02 L |
| A cold start | 100.0 kPa · 2.00 L · 150.0 K | 100.0 kPa · 600.0 K | 8.00 L | 4.000 | 1.333 | 1.333 | 2.00 L then 8.00 L | 8.00 L then 8.00 L |
| Nothing changes at all | 100.0 kPa · 2.00 L · 300.0 K | 100.0 kPa · 300.0 K | 2.00 L | 1.000 | 0.6667 | 0.6667 | 2.00 L then 2.00 L | 2.00 L then 2.00 L |
| Nothing round anywhere | 150.0 kPa · 3.00 L · 355.0 K | 245.0 kPa · 415.0 K | 2.15 L | 0.7157 | 1.268 | 1.268 | 1.84 L then 2.15 L | 3.51 L then 2.15 L |
| A tyre on a hot day | 350.0 kPa · 5.00 L · 290.0 K | 350.0 kPa · 320.0 K | 5.52 L | 1.103 | 6.034 | 6.034 | 5.00 L then 5.52 L | 5.52 L then 5.52 L |
The last two columns are the ones to read. Route A makes the pressure change first, at the temperature the gas started at, and the temperature change second; route B does it the other way about. In eleven of the thirteen rows the two middles are different figures, and in every row both routes finish on the same volume as the one-step answer. That agreement is not built in: the two routes multiply and divide in a different order.
The two PV/T columns are the ones not to read. They are identical in all thirteen rows, and that is guaranteed rather than discovered, because the volume after was computed from the requirement that they match. A column that cannot disagree is a display of the law and not a test of it, which is why the routes get the attention here.
Rows 2 to 4 each move one slider. Bring the temperature after down to 300 K, matching the start, and the answer halves to 1.00 L as the pressure doubles. Bring the pressure after back to 100 kPa instead and it rises to 3.00 L. Set the pressure after to 150 kPa and the answer lands on 2.00 L, exactly where it began.
That fourth row is the careful one. Nothing held the volume at 2.00 L. The pressure ratio reads 0.6667 and the temperature ratio 1.500; multiply those two, as the Volume factor card's own formula line does, and you land on 1.000. The status line spells that out rather than saying volume held, and if you want a container that genuinely cannot stretch, the Gay-Lussac's law lab is built around one.
Rows 8 and 9 are the ends of what the sliders can do. The biggest expansion reads 32.00 L from 1.00 L, and the deepest squeeze 0.02 L from 0.50 L at a factor of 0.03125. Both cylinders stay on a single scale through all of it, so the shrinking gas always looks smaller; two independent scales would have let a squeeze look like a stretch.
Row 12 is there because nothing in it is round. A start of 150.0 kPa, 3.00 L and 355.0 K going to 245.0 kPa and 415.0 K gives 2.15 L at a factor of 0.7157, and the two routes pass through 1.84 L and 3.51 L on the way. Most real states look like this one rather than like row 1.
Formula and symbol reference
The lab works the answer out in one line. It multiplies the pressure before by the volume before, divides by the temperature before, and rearranges to V2 = P1V1T2 / (T1P2). There is no constant of nature anywhere in that expression, so each pressure and each volume appears once above the line and once below it; the temperature does not, and that is why its scale has to start at a real zero.
Where that comes from takes one line. Fix the number of moles in PV = nRT, divide both sides by T, and the left-hand group is left equal to nR — a quantity that cannot move while the sample does not, so it carries the same value at both ends of any change. The guide to the ideal gas law takes that equation apart properly; this lab simply assumes it and holds the amount.
| Symbol | Meaning | SI unit | In this lab |
|---|---|---|---|
| P1 | Absolute pressure before the change. Absolute, never gauge — the lab has no way to add an atmosphere for you | pascal, Pa; the lab works in kilopascals | 50 to 400 in steps of 5, reading back as “100.0 kPa” after Reset. Taking it alone to 50.0 kPa leaves the volume after at “0.75 L”; taking it to 400.0 kPa gives “6.00 L”. |
| V1 | The volume the gas occupied before the change. It scales the answer up or down and leaves the volume factor untouched | cubic metre, m3; the lab works in litres | 0.5 to 10.0 in steps of 0.5; “2.00 L” after Reset. It leaves the volume factor alone: at 0.50 L and at 10.00 L the factor is “0.7500” either way, while PV/T moves from “0.1667” to “3.333”. |
| T1 | Absolute temperature before the change, on the kelvin scale, because the law divides by it | kelvin, K | 150 to 600 in steps of 5; “300.0 K” after Reset. At 150.0 K the volume after is “3.00 L”; at 600.0 K it is “0.75 L”. A hotter start means a smaller answer, because it divides. |
| P2 | Absolute pressure after the change, in the same sense as the pressure before | pascal, Pa; the lab works in kilopascals | 50 to 400 in steps of 5; “200.0 kPa” after Reset. At 50.0 kPa the volume after is “6.00 L”; at 400.0 kPa it is “0.75 L”, and the pressure ratio runs from “2.000” to “0.2500”. |
| T2 | Absolute temperature after the change. The only control that can make the status line change its mind about which law you are looking at | kelvin, K | 150 to 600 in steps of 5; “450.0 K” after Reset. At 150.0 K the volume after is “0.50 L”; at 600.0 K it is “2.00 L”, and the status line switches to the Gay-Lussac wording. |
| V2 | Volume after the change. Computed from the other five and never a slider, which is the lab’s whole premise | cubic metre, m3; the lab works in litres | Two decimal places: “1.50 L” after Reset, “32.00 L” at the biggest expansion the sliders reach and “0.02 L” at the deepest squeeze. |
| V2/V1 | Volume factor: how many times bigger or smaller the gas ends up. The single number that says what the change did | none — it is a ratio | Four significant figures: “0.7500” after Reset. The extremes are “32.00” and “0.03125”, which are the two ends of the same 32-fold span. |
| P1V1/T1 | PV/T before. The quantity the law says is unchanged, worked out from the three figures you set | the lab prints it in kPa L / K | Four significant figures: “0.6667” after Reset, “0.04167” at the smallest, “6.034” on the tyre row. It depends on the whole state, not on the size of the change. |
| P2V2/T2 | PV/T after. The same figure as the card above it in every setting you are likely to meet, because the volume after was chosen to make it so | the lab prints it in kPa L / K | Four significant figures, matching the card above in every one of the thirteen table rows. At 50 kPa, 8.50 L, 400 K to 50 kPa, 480 K the pair reads “1.063” and “1.062” — a rounding split, not a physical one. |
| P1/P2 | Pressure ratio. Above one the gas is being let out into something slacker, below one it is being squeezed | none — it is a ratio | Four significant figures: “0.5000” after Reset. The sliders reach “8.000” at 400 kPa down to 50 kPa and “0.1250” the other way about. |
| T2/T1 | Temperature ratio, in kelvin. Above one the gas is being warmed, below one it is being cooled | none — it is a ratio | Four significant figures: “1.500” after Reset. The sliders reach “4.000” from 150 K to 600 K and “0.2500” from 600 K back down to 150 K. |
| T in °C | Either temperature restated in degrees Celsius. Printed as text beside the kelvin figure, never as a control | degree Celsius, °C | One decimal place: “26.9 °C” and “176.9 °C” after Reset. The slider ends are “-123.1 °C” at 150 K and “326.9 °C” at 600 K. |
| n | The amount of gas. Held fixed throughout, and the reason there is no control for it anywhere in the panel | mole, mol | Not a slider and not a readout. Both cylinders are drawn with the same forty-four dots at every setting, which is the lab saying that the sample never changes. |
The slider ranges in those rows are not arbitrary. Pressure spans a factor of eight and temperature a factor of four, so the largest volume factor the lab can reach is thirty-two, and the smallest is one thirty-second. That bound is what lets both cylinders share one scale without the smaller column becoming too short to see.
The physics: why two routes with different middles end in the same place
Make the change in one step and the lab works out V2 directly. Make it in two and you can take the pressure change first, at the temperature the gas started at, and the temperature change afterwards; or take the temperature change first, at the starting pressure, and the pressure change afterwards. Route A and route B in the strip are those two, and they pass through different volumes on the way.
From the opening state, route A drops to 1.00 L before rising to 1.50 L, while route B climbs to 3.00 L before falling to the same 1.50 L. Press Show both routes and the two middles are drawn across the cylinders as dashed levels, one gold and one cream. The gap between them is the whole point: the arithmetic really is different, and the destination really is not.
That is the honest demonstration this lab has to offer, and the two PV/T cards are not. The volume after was computed to make those cards match, so their matching is the definition restated. Reading them as a confirmation is circular, and no wording on this page invites it.
The same equation contains the three single-variable laws, and the status line says which one you have landed on. It has exactly five sentences, one of which is worded very carefully.
| When | Sliders | What the status line prints |
|---|---|---|
| Nothing moves | 100.0 kPa · 2.00 L · 300.0 K to 100.0 kPa · 300.0 K | Nothing changes: same pressure, same temperature, same volume. |
| The temperature is the same at both ends | 100.0 kPa · 2.00 L · 300.0 K to 200.0 kPa · 300.0 K | Temperature held, so this is Boyle's law: P1V1 = P2V2. |
| The pressure is the same at both ends | 100.0 kPa · 2.00 L · 300.0 K to 100.0 kPa · 450.0 K | Pressure held, so this is Charles's law: V1/T1 = V2/T2. |
| The volume lands back on its starting figure | 100.0 kPa · 2.00 L · 300.0 K to 150.0 kPa · 450.0 K | The volume happens to land back where it started, so the pressures and temperatures are in the same ratio — that is Gay-Lussac's law, P1/T1 = P2/T2. |
| Anything else | 150.0 kPa · 3.00 L · 355.0 K to 245.0 kPa · 415.0 K | Pressure and temperature both change, so only the combined gas law applies. |
The fourth of those is the one worth dwelling on. Boyle, Charles and Gay-Lussac each name a quantity that is held, and in the first three rows something genuinely is. In the fourth nothing is: the volume returns to 2.00 L because P2/P1 happened to equal T2/T1, which is a coincidence of the numbers you chose.
One thing the equation never describes is the journey. It ties one settled state to another and stays silent on everything in between them, which is precisely why path independence is interesting instead of trivial. The intermediate states on the two routes are real states of the gas, and the law declines to prefer either.
There is a temperature effect in the drawing too. Each cylinder's fill runs from a cool blue at 150 K to a warm gold at 600 K, so a change that heats the gas shows in the colour as well as the height. The dots never change in number, because the amount of gas is the one thing held.
Where the combined gas law simulator breaks down
The lab solves its own model exactly, so nothing on screen ever fails. Everything below is a limit of that model, of the situation it stands for, or of the way the numbers are printed, and each item says what the lab does about it.
- The amount of gas is held, and real containers leak
- Both cylinders carry the same forty-four dots at every setting, which is the lab saying that the sample is sealed. Anything that changes how many molecules are in there defeats it: a seal that weeps, a gas taken up by a liquid it sits over, a reaction that creates or destroys molecules. Avogadro's law is the one to read when the amount of gas is itself the thing that moves.
- Both states have to be settled ones
- The law compares a before with an after, and both have to be equilibrium states with one pressure and one temperature throughout. A gas halfway through being compressed is not one, nor is the gas behind a shock front, nor a cylinder whose temperature is still drifting after a fill. The lab draws only the two ends and never animates a process, which is honest rather than a limitation of the drawing.
- The gas is ideal, and real ones are not
- The relation assumes the molecules take up no room and ignore each other, which stops being a fair description near condensation and at high pressures. A gas close to its boiling point, or one being pushed towards liquefying, departs from these figures. How far it departs is a question about a specific real gas, and nothing here measured one.
- Kelvin is not a preference
- The temperature sliders carry no Celsius option because the law divides by temperature, and a scale whose zero is arbitrary gives a ratio that means nothing. A change from 25 to 150 on a Celsius dial looks like a factor of six; in kelvin it is a factor of about 1.42. The Celsius figures beside the sliders are there to be read, not to be divided.
- Absolute pressure is not a preference either
- Every pressure slider means a pressure measured from a vacuum. The dials on tyres, cylinders and manifolds are built to show zero in open air rather than in a vacuum, so setting a slider to a dial reading understates both pressures by the same offset and returns an answer that looks entirely reasonable. The standard atmosphere to add is 101.325 kPa, a defined value rather than today's weather.
- The two PV/T cards can disagree on screen
- Rarely, and only by rounding. At 50 kPa, 8.50 L and 400 K going to 50 kPa and 480 K they read 1.063 and 1.062: the same quantity, but the second is reached through more floating-point steps and lands a hair under the half that would round it upward. The quantity is equal; the fourth significant figure need not be.
- Multiplying the figures on screen will usually not come out
- Do not check the law that way. Volumes are rounded to two decimals on their own and PV/T to four significant figures on its own, so recomputing one from the other lands a digit adrift in most settings the sliders can reach. At 50 kPa, 0.50 L and 150 K going to 50 kPa and 205 K the volume after reads 0.68 L, and 50.0 times 0.68 over 205.0 gives 0.1659 against a printed 0.1667.
- Carrying a rounded middle through a route changes the answer
- The route sentences print their middle volume to two decimals but carry the unrounded one onward, which is why they land where the one-step answer does. At 50 kPa, 0.50 L and 150 K going to 90 kPa and 330 K route A reads 0.28 L then 0.61 L; multiply the 0.28 L you can see by the temperature ratio of 2.200 beside it and you get 0.62 L instead.
- The piston glide is a drawing, not a process
- When a slider moves, the piston slides to its new height over a fraction of a second. That is an animation put there so the eye can follow which way the volume went, and it is not a compression happening at any particular rate. Nothing in the law says how long a change takes, and the lab reports no time anywhere.
- Every number here is a setting, not a measurement
- The five sliders are things you chose, and no part of this lab has measured a cylinder, a balloon or a tyre. The panel will happily hold half a litre at 400 kPa and 150 K; whether any real vessel would is a separate question the arithmetic has no view on.
Where the combined gas law is actually used
- Anything sealed that goes up in the air
- A balloon, a sealed packet or an instrument housing carried upward meets thinner air and colder air at the same time, and those two pull opposite ways: thinner air lets it swell, colder air draws it back in. Load The biggest expansion to see what happens when the pressure wins by a wide margin, and read the volume factor rather than the volume.
- Decanting a fixed quantity of gas somewhere colder
- Take a sealed quantity out of a warm room at one pressure and put it into a chilled one at another and this is the sum you are doing. The question is almost always the volume factor, because that is what decides whether the receiving vessel is big enough. The lab's Volume factor card is that number on its own.
- Something rigid that gets warm
- When a container cannot change its volume, the heat has nowhere to go but the pressure. Set both pressure sliders the same and the lab shows you the opposite case, where the volume is free and the pressure is held, which is a useful contrast: the Gay-Lussac's law calculator is the tool for the rigid one, and its readings are pressures rather than volumes.
- Bringing two measurements to the same conditions
- Two gas volumes measured in a laboratory on different days sit at different pressures and different temperatures, so they cannot be compared until both are converted to a common pair. That conversion is this equation, and it is what a data sheet means by a volume corrected to standard conditions. Density figures carry the same caveat, which is why the gas density calculator asks for both.
- The gas-syringe practical
- Trap some air behind a plunger or in a stoppered tube, move the pressure and the temperature, and the volume is the thing you are asked to account for. Set the same five figures here first and the lab gives you the number to compare your reading against, along with the volume factor that says how big the effect should have been. A stubborn discrepancy usually points at the seal or at a thermometer that has not caught up.
- Telling students which law a problem actually needs
- A great many gas problems are really a question about which quantity is held, and the status line answers it in words. Drag one slider until a ratio reaches one and watch the general law collapse into Boyle's, Charles's or the Gay-Lussac case; drag it off again and watch it open back out. That is hard to see on paper and immediate here.
- Separating a pressure effect from a temperature one
- When a volume has changed and both causes are in play, the pressure ratio and temperature ratio in the strip say which did more. On the opening change they read 0.5000 and 1.500, and their product is the Volume factor of 0.7500, so the squeeze has beaten the warming. Solids and liquids behave quite differently here, and thermal expansion covers that case.
Where to go next
For the method itself, with worked problems of rising difficulty and the two-route picture drawn out properly, read The Combined Gas Law. If you would rather type numbers than drag sliders, or you need one of the other five quantities instead of the volume after, the calculator is the first card under Related tools below.
The three special cases each have a page of their own: Boyle's law for a squeeze at one temperature, Charles's law for warming at one pressure, and Gay-Lussac's law for a gas in something rigid. For the single-state equation with the mole count still in it, read what PV = nRT says about one state and try the ideal gas law lab beside it.
Further afield, the difference between heat and temperature is worth having straight before any of this, and the laws of thermodynamics set the frame the gas laws sit inside. The rest of the collection is in the library of physics simulations and on the blog, and the site search will find a topic by name.
Frequently asked questions
Why do the numbers on screen not quite multiply out?
Your arithmetic is fine; the display is rounded. Volumes print to two decimal places and PV/T to four significant figures, so working one out from the other usually lands a digit adrift. Put the sliders on 50 kPa, 0.50 L and 150 K going to 50 kPa and 205 K: the volume after reads 0.68 L, and 50.0 times 0.68 divided by 205.0 gives 0.1659 against a printed PV/T after of 0.1667.
Do the two PV/T cards prove the law is working?
No, and the lab never claims they do. The volume after is computed from the requirement that the two agree, so watching them agree is the definition restated rather than evidence for it. The demonstration that could actually fail is Show both routes: squeezing first and warming first pass through different middle volumes and still finish on the same one.
Can the two PV/T cards ever disagree on screen?
Yes, in a small minority of settings, purely from rounding. Put the sliders on 50 kPa, 8.50 L and 400 K going to 50 kPa and 480 K and the two cards read 1.063 and 1.062. The quantity is the same on both sides of the change; the second figure is reached by a longer chain of floating-point steps and lands just under the half that would round it up.
Why is there no slider for the volume after?
Because that is the one quantity the law hands you rather than the one you choose. Five things are yours to set and the sixth follows from P1V1/T1 = P2V2/T2, which is the whole point of the lab. If you would rather fix the volume after and be told something else instead, the combined gas law calculator lets any one of the six be the unknown.
Why are the temperature sliders in kelvin rather than Celsius?
Because the law divides by temperature, and a scale that runs below its own zero would hand a negative denominator, or a zero one, to that division. The lab prints each setting in degrees Celsius alongside instead, so 300.0 K is there to read as 26.9 degrees C while the arithmetic stays in kelvin. The conversion is taught and the mistake is not available.
Why does the status line sometimes name Gay-Lussac's law?
It means the volume has landed back on its starting figure by coincidence, not because anything held it there. Set 100 kPa, 2.00 L and 300 K going to 150 kPa and 450 K and the volume after reads 2.00 L, because the pressures and the temperatures happen to be in the same ratio. Nothing in the lab fixes a volume, and the status line is worded to say so.
Why do the two route lines sit at different heights?
Because they are different middles of the same change. Route A takes the pressure change first, at the starting temperature, and route B takes the temperature change first, at the starting pressure, so from the opening setting one passes through 1.00 L and the other through 3.00 L. Press Show both routes to draw them across the cylinders as dashed levels. Both end on 1.50 L.
How large a change can the five sliders reach?
The widest expansion is thirty-two-fold and the deepest squeeze is its reciprocal. Set 400 kPa, 1.00 L and 150 K going to 50 kPa and 600 K and the volume after reads 32.00 L at a volume factor of 32.00. Put the pressures and temperatures the other way about, at 50 kPa, 0.50 L and 600 K going to 400 kPa and 150 K, and you get 0.02 L at a factor of 0.03125.
Does any of this hold if gas leaks out or a reaction takes place?
No. The amount of gas is the one thing this law holds fixed, which is why both cylinders carry the same forty-four dots however far the piston travels. Molecules escaping past a seal, going into solution, or being created and destroyed in a reaction all change the quantity this law treats as constant, and none of those has a control here because none of them is modelled.
References & formula source
- Zemansky and Dittman, Heat and Thermodynamics: equations of state, and what makes a state an equilibrium state rather than a moment during a change.
- Atkins and de Paula, Atkins' Physical Chemistry: the properties of gases, for the combined form as the ideal-gas equation with the amount of substance held fixed.
- Halliday, Resnick and Walker, Fundamentals of Physics: the kinetic theory of gases, for why a ratio of temperatures has to be taken on an absolute scale.
- Serway and Jewett, Physics for Scientists and Engineers: the gas laws worked as comparisons of a before with an after rather than as single-state evaluations.
- The standard atmosphere of 101.325 kilopascals and the ice point of 273.15 kelvin are defined values rather than measurements. Every figure on this page is a reading this simulation printed for a setting of its own sliders; none of them describes a particular cylinder, balloon, tyre or sample of gas. Verify against your own apparatus before use.
- Further reading: Gas laws — Wikipedia